2011年3月31日星期四

How to import music from iPod to iPod without iTunes

Ever since iPod was released, millions of people have been crazy about it. There appeared some assistant tools to manage iPod without iTunes:

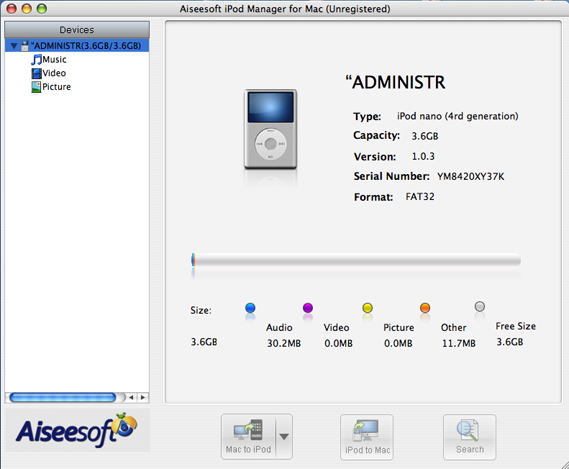
1.Aiseesoft iPod Manager for Mac is one of the best Mac tools that can transfer Mac to iPod Shuffle, iPod backup for Mac. It is the best for iPod iTunes Mac software.

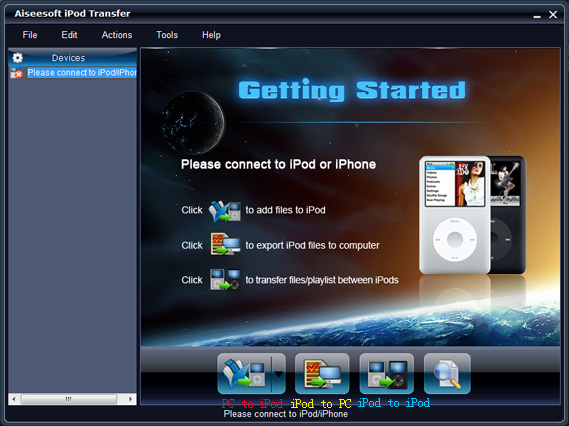
2.Aiseesoft iPod Transfer is another Windows all-in-one tool including iPod to iPod Transfer, computer to iPod Transfer and iPod to computer transfer.

Part One: How to manage iPod without iTunes on Mac. (Transfer Mac to iPod Shuffle, iPod Backup for Mac)

1.Download and install Aiseesoft iPod Manager for Mac.
For Intel: http://www.aiseesoft.com/downloads/mac/ipod-manager-for-mac.dmg
For Power PC: http://www.aiseesoft.com/downloads/mac/ipod-manager-for-mac.dmg
2.Connect iPod to Mac via USB.

Transfer Mac to iPod Shuffle:


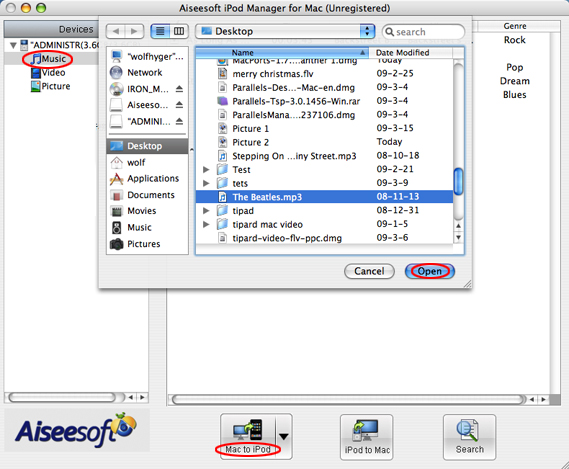
Select “Music”, “Video” or “Picture”. Then click “Mac to iPod” to choose the files you want to transfer to iPod. Click “Open” to finish the transfer.

iPod Backup for Mac:


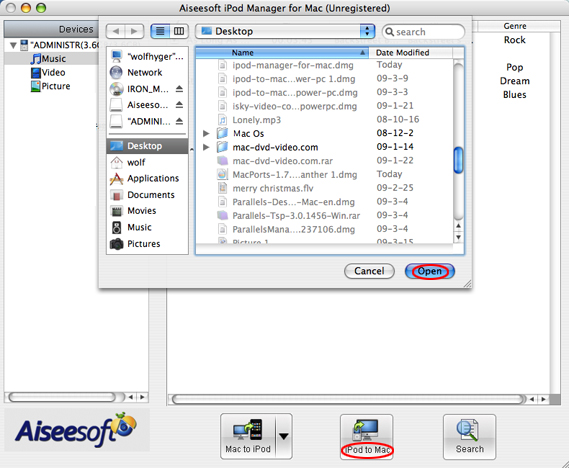
Select files you want to backup. Click “iPod to Mac” and find the place where you want to transfer your iPod files to your Mac and click “Open”.

Part Two: Computer to iPod Transfer, iPod to iPod Transfer, iPod to Computer Transfer for Windows users

1.Download and install Aiseesoft iPod Transfer.
2.Connect iPod/iPhone to computer.


Computer to iPod Transfer
Click “computer to iPod” button to seek the files or folders that you want to import to iPod and click OK.

iPod to iPod Transfer
Pick the files that you need to transfer. Just click “iPod to iPod” button and it will show you the folder of another iPod that you want to transfer to. Click OK. The transfer can be finished automatically.

iPod to Computer Transfer
Check the file(s) you want to export in the file list. Click “iPod to computer” button to
select the destination of the exporting files and start exporting files.

Hope it helps you!

2011年3月27日星期日

This guide aims to show you how to rip a DVD, convert video and transfer music from ipod to computer with only one tool.
It includes 3 parts:
Part 1. How to rip DVD to iPod/iPhone/Sansa/PSP/Zune and other MP4 and MP3 Players
Part 2. How to convert all video to MP4, AVI, FLV, 3GP, WMV, MOV, MPG, RM, RMVB, MKV, VOB…
Part 3. How to backup iPod songs and videos on your computer


Believe or not, to do the things above what you need is download Aiseesoft DVD Converter Suite and few clicks.


Part 1. How to rip DVD to iPod/iPhone/Sansa/PSP/Zune and other MP4 and MP3 Players.
Step 1. Click “DVD Ripper” on the main interface to run Aiseesoft DVD Ripper.


Step 2. Open your DVD Drive and put your DVD in it, then click “Load DVD” and choose “Load DVD” to load your DVD into this best DVD ripper.
Step 3. Choose your output format from the “profile” drop-down list. This best DVD ripper provides you so many formats that out of your expectation, such as “iPod video MPEG 4 (*.mp4)”, “iPhone 3G MOV 640*480 (*.mov)” and so on.

After you choose your output format, you can adjust your output video’s settings, such as “Resolution”, “Frame Rate”, “Bitrate”, “Sample Rate” and so on.
Click “Start” now to begin your conversion and you will get your video soon.

To make your output movie more enjoyable you can do some editings to it through this best DVD ripper. You can choose a part of your movie to convert (trim), remove the black edges of your DVD movie (crop) and also adjust the effect (effect) and select subtitle and audio track.


Part 2. How to convert all video to MP4, AVI, FLV, 3GP, WMV, MOV, MPG, RM, RMVB, MKV, VOB…

Step 1. Click “Total Video Converter” on the main interface to run Aiseesoft Total Video Converter


Step 2. Click “Add File” to load the video you want to convert.
Step 3. Choose output format by clicking “profile” and customize your own output video by
clicking “settings” to adjust the Resolution, Frame Rate, Bitrate and so on.
Before you click “Start” to begin your conversion, you can do some editing works, such as pick up a part of your video to convert(trim), choose your own play region(crop) and put two or more files into one.(merge into one file).
OK, now you can begin your conversion.

Part 3. How to backup iPod songs and videos on your computer.
Step 1. Click “iPod to Computer Transfer” to run Aiseesoft iPod to Computer Transfer.


Step 2. Plug your iPod to your computer and the Aiseesoft iPod to Computer Transfer can automatically scan and find your iPod.
Step 3. Choose the songs and videos you want to backup.
Step 4. Click “export to PC” button to transfer your songs and videos to your Computer.

Aiseesoft iPhone to Computer Transfer

2011年3月24日星期四

How to Convert MKV to iPad 2 with MKV to iPad 2 Converter?

iPad 2 does not support play MKV movie/video. So if iPad 2 users want to watch movies in MKV format, they need to convert MKV video file to iPad 2 supported video format. The following guide aims to show you how to convert MKV video to iPad 2. You just need 3 steps and you will can put your movies to iPad 2 to watch.

Step 1. Download and install MKV to iPad 2 Converter, certainly if you are Mac users, you need download the Mac MKV to iPad 2 Converter

After you install this powerful MKV to iPad 2 Converter, you need to run it and load the MKV file to it by clicking "Add File" or directly drag the video file to it.


Step 2. Choose output profile

This nice MKV to iPad 2 Converter provides different iPad 2 output profiles for you to choose. You can choose your own output profile according to your need.


You can also adjust the specific video settings of the output video, such as resolution, video bitrate, video encoder, audio encoder, frame rate and so on. It is really considerate that it also allows you to save the profile and name it yourself.


Step 3. Conversion

After you have done all the preparation, you just need to click "Convert" button to start the conversion and soon you will get your video.

2011年3月15日星期二

How to convert VOB to iPad 2?

How to convert VOB files to iPad 2 conveniently and quickly? This guide will introduce you a powerful VOB to iPad 2 Converter to help you convert VOB file to iPad 2 video and audio formats.

Aiseesoft VOB to iPad 2 Converter is a professional software to assistant users to convert VOB files to iPad 2 compatible video and audio files with outstanding converting speed and best output quality.

Step 1: Download VOB to iPad 2 Converter


Download this VOB to iPad 2 Converter and install it. Then you can run it to prepare for converting VOB files.


Step 2: Input VOB file

You can input your local VOB file by clicking the "Add File" button. Also you are able to input some other video formats.

Step 3: Edit video effect

Aiseesoft VOB to iPad 2 Converter can help you cut off video segment, crop video playing frame, add watermark to your video, and modify video brightness, saturation and contrast.


Step 4: Output profile

This iPad 2 Video Converter will offer you several output formats for you to choose. You can click the "Profile" option and choose your preferred output profile.


Step 5: Convert VOB file to iPad 2

Click the "Convert" button to convert VOB to iPad 2. Then you can enjoy the output video with your iPad 2.

2011年3月11日星期五

How to Rip DVD, Convert Video, Backup iPod info,Make iPhone Ringtone, Copy DVD on Mac

Two years ago, I had my first Mac. Today I get my new MacBook Pro. So I am totally a Mac fan now. I enjoy my Mac very much. I always watch movies on my Mac and sometimes rip my DVD movies on it and convert video to another format. Also I make my own iPhone ringtone on it. And recently, I copy my DVDs on it as well. Now I will share my experience with you.

My article includes 5 part:
Part 1. How to rip DVD to video format on Mac
Part 2. How to convert video on Mac
Part 3. How to transfer info between iPod and Mac
Part 4. How to make iPhone ringtone on Mac
Part 5. How to copy DVD on Mac

Before we get start, I want to introduce you a really powerful tool:
Aiseesoft DVD Software Toolkit for Mac. It can do what I said above easily.


Part 1. How to rip DVD on Mac
Just click DVD Ripper for Mac on the main interface.

Step 1. Load you DVD.
Click the “Load DVD” button(a), find the DVD folder of the movie you want to add from your DVD-ROM, and Click “Open”.

Tick the check boxes(b) before the titles and chapters that you want to rip.

Step 2. Chose output profile and settings.
Selecting output format is really easy, you can chose your output format according to your devices players and the default setting works great.

Tips: Sample rate (Hz) = any value up to 48000 (higher value = better sound quality = bigger file)
Bitrate (kbps) = any value up to 160 (higher value = better sound quality = bigger file)
After setting your own output and settings you can click “Start” button to start your conversion. (The time of the conversion depends on your DVD and the settings you chose.)

Part 2. How to convert video on Mac
Click Video Converter for Mac on the interface.


Step 1. Load video
Easily click “Add File” to load your video that you want to convert.

Step 2. Choose output profile and settings
At the bottom of the interface there are a drop-download list named “profile”. You can choose your output format here.

You can also adjust the settings of your output video, such as Resolution, Bit rate and so on.
After you finish the 2 steps, you can just click “Start” button to start your conversion.

Part 3. How to transfer info iPod and Mac
Use iPod Manager for Mac

Step 1. Plug your iPod to your Mac
Aiseesoft iPod Manager for Mac can find it automatically.


Step 2.
a. if you want to transfer music and videos from iPod to Mac

Pick up what you want to backup
Just click Music and all of your music on your iPod will be listed, so you can pick up which songs you want to transfer. (Click “Video”/“Picture”, if you want to backup your videos and image.)

Click “iPod to Mac” and find where to put your iPod info on your Mac and click “Open”

b. if you want to put music and videos from Mac to iPod.
1. Click “Music”
2. Click “Mac to iPod” and pick up the songs on your Mac you want to put on your iPod and click “Open”
(If you want to put video/image, just click “Video”/“Picture” and other operation is the same as putting songs)

Part 4. How to make iPhone ringtone on Mac
Click iPhone Ringtone Maker for Mac on the main interface.


Step 1: Click “Browse” on the right side of "Input File" to import the file that you want to make ringtone from it.

Step 2: Play it and listen the music to find the segment that you want to use it as ringtone. Then drag and click the start & end slider to set your wanted segment, or type the start & end time in the corresponding text box directly to get the exact segment. You also can pre-listen the converted audio before generate.

Step 3: Click “Browse” on the right side of "Local Output Folder" to choose the output destination.

Step 4: Check "Export to iPhone" option, the converted ringtone will be load to your iPhone directly.
[b]Step 5[/b]: After all the settings are finished, click “Generate” to begin making your own iPhone ringtone.

Key function
● Convert any video to iPhone ringtone M4R
● Create iPhone ringtone from any audio files
● Get any clips from video and audio
Edit Added iPhone ringtones

Part 5. How to copy DVD on Mac
You need to use DVD Copy for Mac.


Step 1. Load Your Source
This excellent DVD copy for Mac allows you to load DVD folder and DVD image ISO.

Step 2. Choose Output Info
1. “Full Disc” or “Main Movie”
This DVD copy for Mac enables you to copy the full disc and also the main movie according to your need.

2. “Audio”, “Subtitle” and “Volume” name
You can choose your output audio from the “Audio” drop-down list, such as “all audio”/ “None”/ or some audio the DVD provide.

Subtitle is always an important thing, you can choose your output subtitle in “Subtitle” drop-down list.

You can also name your output volume's name

Step 3. Choose Your Target
You can copy your DVD to another DVD disc, DVD folder or DVD image ISO.

Tips:
1. You can also choose to copy the menus or not.
2. All the info you choose will be dispalyed on the “Info Box”.

2011年3月9日星期三

How to Rip DVD(windows/mac), Copy DVD, Convert Video?

Every year, my family will have a big party and all the members will get together. We have a very nice time on each year's party. And from the year 2000, I record the party and share with my family. I enjoy the work very much, while when I share the video or the DVD, it is really a big problem. But now I can solve it with only a few clicks.

So I write this article to show you guys how to deal with dvd and video stuff.

Part 1: How to Rip DVD on Windows and Mac

First Let me explain what is rip DVD. When I talk about “Rip DVD”, it means I will convert DVD video/movie to video format and you can play the video/movie without the disc. Of course, the original DVD will not be hurt.

For Windows users:
You need a DVD Ripper.


Step 1: Load your DVD to it
Step 2: Choose output profile
Step 3: Start Conversion


For Mac users:
Step 1: Download DVD Ripper for Mac.


Step 2: Load you DVD
Step 3: Choose output profile
Step 4: Start Conversion


Part 2: How to Copy DVD video/movie to another DVD Disc
To Copy a DVD to a blank DVD Disc you need a DVD copy Software and a DVD +/- RW Drive and a blank DVD Disc.


Step 1. Choose Source:
The source of this DVD Copy software can be: DVD disc, ISO image file and DVD folder
Step 2. Preparation
Before you click the “Start” button,
1. You can choose to copy the full disc or the main movie.
2. You can choose the audio, subtitle of the copy.
3. You can change the name of the volume.
4. You can choose to “include menu” or “skip menu” or neither of them.
Step 3. Choose Target:
You can copy your source to 3 target: DVD disc, ISO image and DVD folder
Step 4: Start Copy

Part 3: How to Convert Video
Here you need a Video Converter to help you.


Step 1: Add Video
Step 2: Choose output profile
Step 3: Start Conversion


Aiseesoft iPhone to Computer Transfer

2011年3月4日星期五

How to Easily Convert and Edit Video/Audio for Nexus One

What is Nexus One?
The Nexus One is a smartphone from Google, released on January 5, 2010. The phone is featured with the ability to transcribe voice to text, noise canceling dual microphones and GPS guided turn-by-turn voice directions to drives.

Besides features above, this version of the Nexus One can also hold video and audio. I feel most of users want to add moive video and music. But the not supported format is the problem. So Nexus One Converter was released closely following the Nexus One. It can easily convert popular video format, such as HD videos, SWF, FLV, VOB, MOD, MP4, H.264, M4V, AVI, WMV, 3GP, 3GPP, MOV, DivX, XviD, QuickTime Video, DV, MJPG, MJPEG, MPV, MPEG, MPEG2, MPG, etc. to formats (MP4, 3GP, AVC, AVI, MPEG-4, etc.) supported by Nexus One.

Next this article shows you how to use Aiseesoft Nexus One Video Converter.

Tips: How to effect, trim and crop the video to improve your output video quality.
After your Load your video you can click “Effect” button to access the editing panel.

1: Effect
Adjust the video effect as you want: Brightness, Contrast, Saturation and Deinterlacing.
2: Trim
Clip your video, pick up any part of your video to convert.
3: Crop
Adjust video size, Cut off the black edge of your video to let you enjoy your movie in full screen by click the 'Crop' button.
You can also select the aspect ratio from the Zoom Mode drop-down list. There are 4 choices for you: Full Screen, 16:9, 4:3 and Keep Original.

If you want a try, download and install Aiseesoft Nexus One Video Converter.

After you convert your videos you can put the video to your Nexus One.