2011年7月27日星期三

Apple Finishing Up Work on an Ultra-Thin 15" Notebook

Apple is working on a 15" ultra-thin Mac notebook, MacRumors has learned. We aren't certain if it will be called a MacBook Air or MacBook Pro, but we do know that it is already in late testing stages at Apple.

Apple's notebook lineup has received a significant revamp over the past two years, and the introduction of the MacBook Air seems to have finally edged out the low-end MacBook design. While originally priced as a premium product, the Air seems to have found a more mainstream market as its starting price dropped to only $999.


MacBook Air
Many now expect that Apple's design choices in the Air will eventually make their way to the MacBook Pro product, with the use of integrated SSD and lack of optical drive being the most notable changes allowing for such a thin design. While we don't know for a fact, we expect that any future "ultra thin" laptop from Apple will also dispense with a built-in optical drive. As evidenced by its recent release of the optical drive-less Mac mini, Apple has no problem leaving physical media behind.

The ultra-thin market is also about to get much more competitive this fall as Intel's partners begin launching their Ultrabook notebooks.

The timing of an ultra-thin 15" Apple notebook remains a mystery to us as Apple just revamped the MacBook Air with new 11" and 13" models. Meanwhile the MacBook Pro line was refreshed in February, likely pushing the next release out to at least very late in the year.

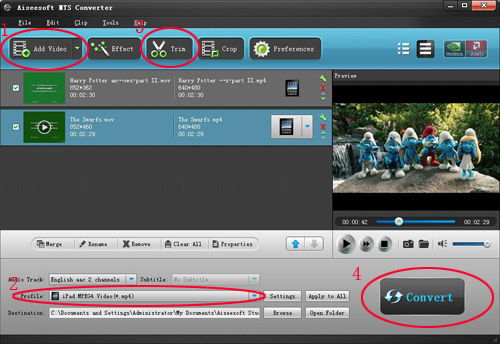
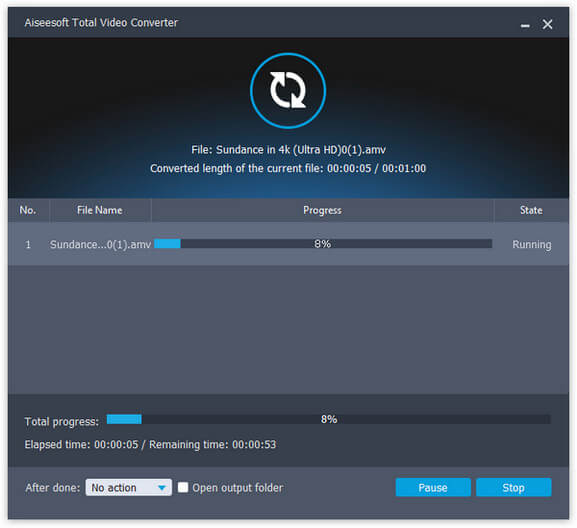
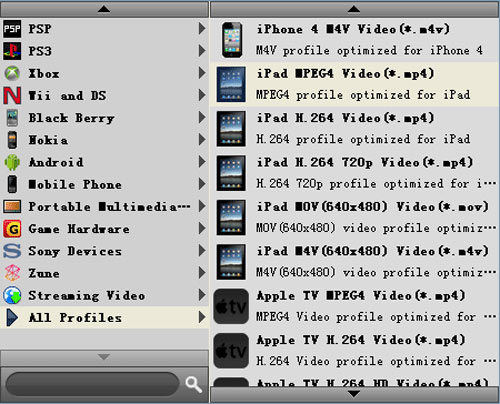
All of us who have got iPad are looking for best and easy converter programs with the enjoyment of iPad miracle. In this way it will become more convenient to enjoy music, movie video and ebook, etc.. I found several programs that are really easy to use.
No. 1 iPad Converter Suite
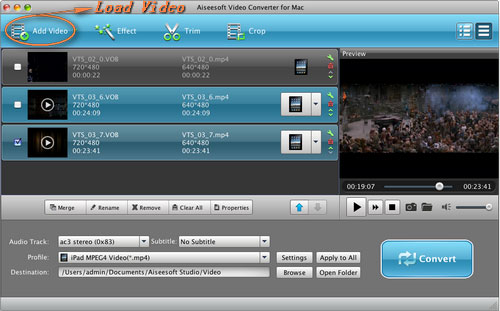
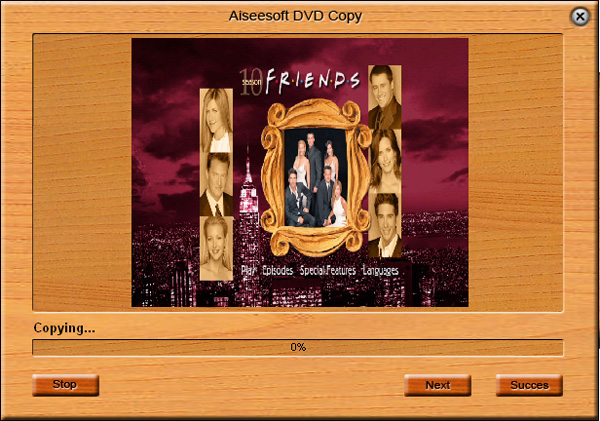
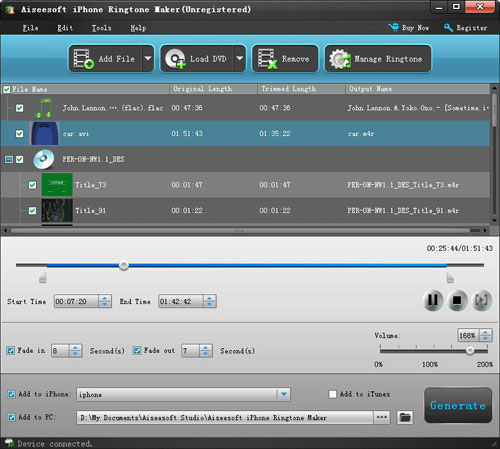
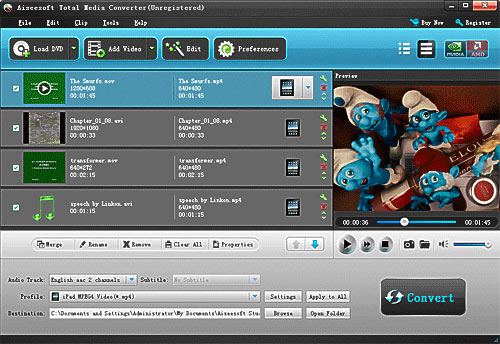
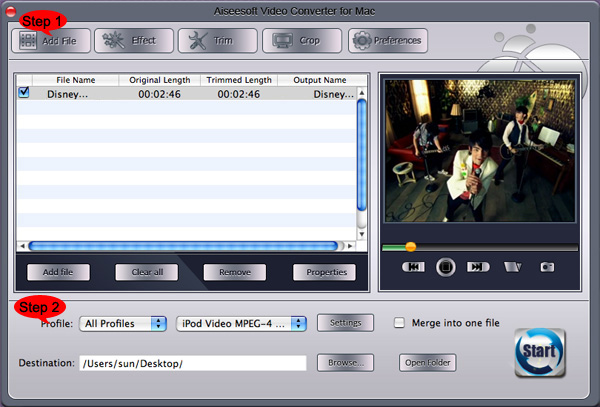
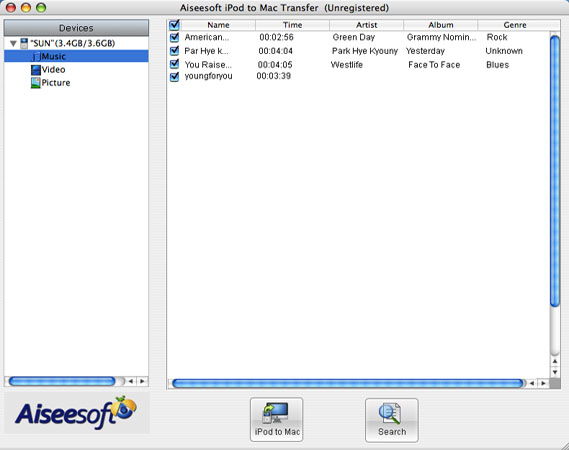
iPad Converter Suite is the first choice for all because it can rip DVD, convert video to iPad and transfer files from iPad to computer. Only program can do almost all things.

No. 2 Free iPad Video Converter
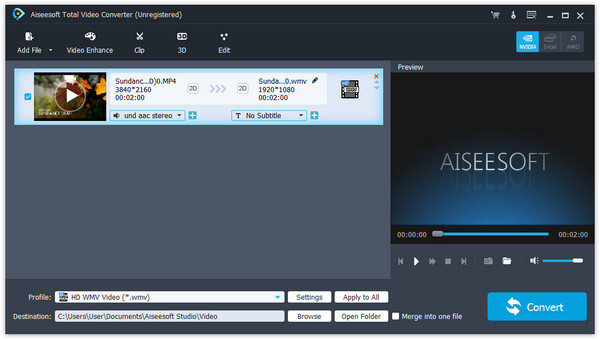
iPad Video Converter is a wonderful simple and easy iPad video converter. It can convert almost all video formats to iPad which lets you enjoy watching any video on your iPad anywhere and anytime.

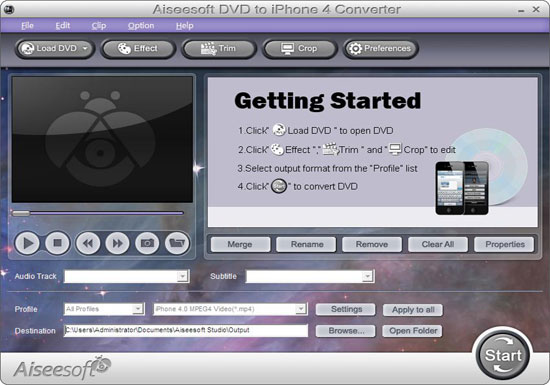
No. 3 DVD to iPad Converter
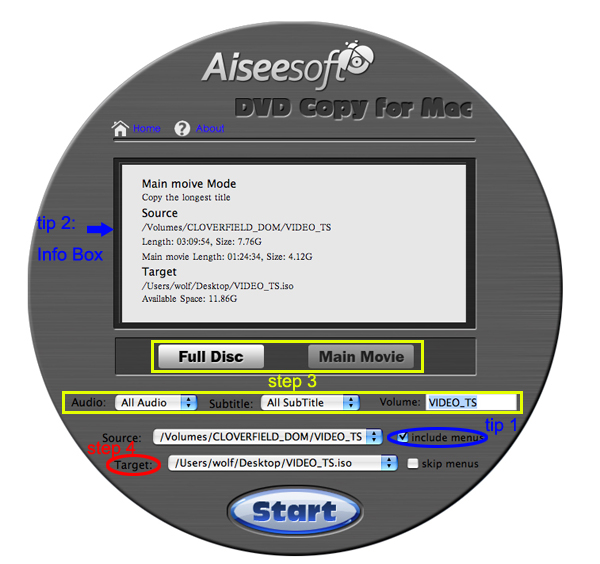
DVD to iPad Converter is mainly to rip DVD for iPad to MPEG, MP4, AVI, WMV, RM, DivX etc..
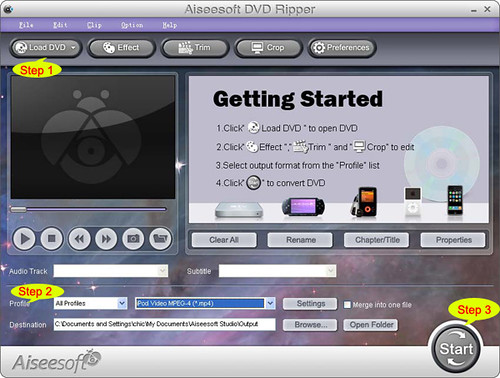
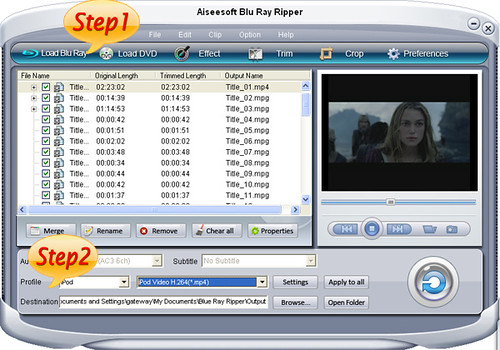
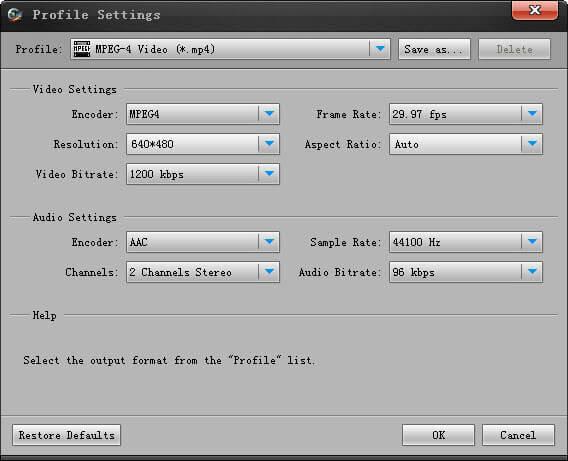
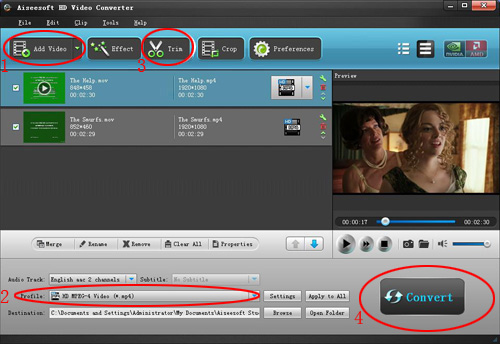
In addition, these programs above are good video editor. They can trim, crop and add watermark to video. All are so easy to meet your requirement.

2011年7月26日星期二

Tips for MTS, TS, M2TS High Defination Video Format

More and more people have their own Camcorder to record their life, family parties and something important to them.
But there are some problems when you:
1. When you want to edit them in Windows Movie Maker or some other edit software
2. When you want to put them into your portable media players, such as iPod, iPhone, Zune, Creative Zen and so on
3. When you want to watch them on some HD video players, such as Xbox, PS3, Apple TV and so on.
4. When you want to share your videos with your friends on youtube, myspace and other online video website.
All the problems' reason is the video format, MTS.
The video format of your HD Camcorder is MTS, and it is not supported by almost any video editing software, PMP, HD video Player and youtube.
So you have to convert it to common video formats.

Tip 1: Some knowledge about MTS, M2TS, TS

MTS format is a high-definition MPEG, AVC, H.264 transport stream video file format which commonly used by HD camcorders such as Sony, Canon, Panasonic, JVC. etc.
.MTS files are used primarily with Sony hardware. Camcorders make use of MTS in the form of AVCHD, a format for recording and playback of high definition video.
M2TS is a Sony high definition video file type. M2TS files are raw AVCHD videos recorded using Sony's camcorders, such as the HDR-SR(xx)series models. Panasonic, Canon and other brands of AVCHD camcorders also record in M2TS format.
TS (Transport Stream) is a communications portocol for audio, video, and data. It is a type of digital continer format that encapsulates packetized elementary streams and other data.

Tip 2: How to solve the 4 problem above.
It is easy to imagine that i met those problems when i got my first HD Camcorder. But now it is really easy for me to solve those problems.
The most important thing is convert your MTS file to other video files.

And here i recommend you Aiseesoft MTS Converter

The following is a simple guide for you:


Step 1: Load Video
Click “Add File” to load the video that you want to convert to Aiseesoft MTS Converter.

Step 2: Choose Your Output Profile and Settings
From “Profile” drop-down list you can choose your output profile according to your need.
For example, if you have a iPod and you want to convert video for it, you need to choose “iPod” from the profile list and then it also provides the second chance to specify your iPod generation.
You can also click “setteing”adjust the settings of your output video, such as “video/audio encoder”, “Video/audio Bitrate”, “Channels”, “Resolution” and so on..

Step 3: Video Editing
This powerful MTS Converter allows you to do many video editings.
1. Click "Effect" to make special effect for your movie.
You can adjust the “Brightness”, “Contrast”, “Saturation” and also you can use “deinterlacing” to improve you output effect.
2. Trim:
“Trim” function allows you to pick up any part of your video to convert. You can just convert a part of your video that you want.
3: Crop:
Cut off the black edges of the original movie video and watch in full screen on your iPod using the "Crop" function.

Step 4: Conversion
After you have done all the steps above you can click “Start” button to start your conversion.

Tip 3:
If you want to know more about TS, you can have a look Aiseesoft TS Video Converter

2011年7月25日星期一

How to Rip DVD and Convert Video for Your New iPhone 4

With the release of iPhone 4, Aiseesoft Studio also releases corresponding converting software for iPhone fans. The main products are Aiseesoft DVD to iPhone 4 Converter and Aiseesoft iPhone 4 Movie Converter. Aiseesoft DVD to iPhone 4 Converter can convert DVD to iPhone 4 easily and fast. Aiseesoft iPhone 4 Movie Converter can convert MPG, MPEG, MPEG 2, VOB, DAT, MP4, M4V, TS, RM, RMVB, WMV, ASF, MKV, 3GP, 3G2, FLV, SWF, MPV, MOD, TOD, QT, MOV, DV, DIF, MJPG, MJPEG, HD video, AVI to iPhone 4. So why do you always buy movies and songs from iTunes with extra money? It can help you make use of your resources.

The software is very easy in use. You just need download, install and run the trial version.


The product is multifunctional. It can trim, crop, edit video effect, merge, add text and image watermark, select audio track and subtitle, adjust video settings and snapshot.
Moreover, there are other products relevant to iPhone 4 such as Aiseesoft Blu-ray to iPhone 4 Ripper, Aiseesoft iPhone 4 Ringtone Maker and Aiseesoft iPhone 4 Transfer. If you are interested, you can have a try.

If you are a Mac user, you can also enjoy them.

2011年7月24日星期日

Full Guide: How to Convert DVD to MP4, AVI, 3GP, iPod ......

DVD is the first choice for many people when they want to watch movies at home. It has high quality picture, different subtitles and audio tracks and most important, some of the DVD movies are more enjoyable than than the cinema one.
However, when we travel, when the disc is broken, when we want to backup the DVD movies, when we want to share the movies with friends, when we want to make usage of the movie, what should we do?
Convert DVD to video video formats you need.

This guide aims to show you how to convert DVD to different video format both for windows/mac users.

Part 1: How to Convert DVD on Windows with DVD Ripper


Step 1: Load DVD
Put your DVD to your DVD Drive and click “Load DVD” button to add your DVD
Step 2: Choose Profile
Choose your output video profile from a drop-down list.
Step 3: Start Conversion

Part 2: How to Convert DVD on Mac with DVD Ripper for Mac


Step 1: Load DVD
Click the “Load DVD” button, find the DVD folder of the movie you want to add from your DVD-ROM, and Click “Open”.
Step 2: Choose output profile and settings
Selecting output format is really easy, you can chose your output format according to your devices players and the default setting works great.
For a veteran of digital player, you could customize your own settings by clicking “Settings” button to chose your own video resolution, frame rate, bit rate, encoder, etc.
Step 3: Start Conversion

If you want to convert both DVD and videos, here is a really powerful DVD Converter Suite . It can help you to convert DVD and videos easily. It can also help you to backup the iPod music and videos to your computer.

2011年7月22日星期五

Apple will release a white iPod touch late this year

Appleinsider reports that apple will publish a white iPod touch late this year with some new features. Concord Securities analyst Ming-Chi Kuo said recent industry checks point to Apple unveiling a white iPod Touch in August or September, which is typically when the company shows off its new portable music players. However, the new device will have few if any feature changes from the current iPod Touch, Kuo said.

Apple's iPod Touch is currently available in black. The device comes with a Retina display, HD video recording, and FaceTime video chatting. Apple sells 8GB, 32GB, and 64GB models for $229, $299, and $399.

Apple launching a white version of the iPod Touch with little to no improvement isn't unprecedented. Earlier this year, after a long wait, Apple finally launched the white iPhone 4, which delivered the same functionality as the black version. That device currently retails for $199 and $299 for 16GB and 32GB versions, respectively.

Exactly why Apple apparently won't update its flagship iPod this year is unknown. However, Kuo told AppleInsider that it could have something to do with Apple's desire to focus its mobile efforts on the iPhone and iPad.

It might not be a bad idea. Apple's iPod business has been on the decline as of late as the company's other mobile products soar. During Apple's fiscal third quarter, the company sold 7.54 million iPod units, representing a 20 percent decline year over year, it announced earlier this week. Apple sold 20.34 million iPhones and 9.25 million iPads to tally year-over-year gains of 142 percent and 183 percent, respectively.

During the fiscal third quarter, Apple's iPod revenue was just 4.6 percent of its total sales. During the same period last year, the iPod's revenue share stood at nearly 10 percent.

Even so, there's no telling what Apple might have planned. The company is notoriously secretive, and any rumor must be taken with a grain of salt.

Apple declined to comment on whether it will launch a new iPod later this year.

Total video converter and Best DVD Ripper is now the perfect software for converting video and DVD to iPod touch.

2011年7月21日星期四

How to Put Your Blu Ray DVD to Your iPod/iPhone?

Blu-ray movies are replacing the standard DVD movies for its sharper, brighter, and more detailed. You will feel you are watching movies in theater except the size of your and you are in your home. Blu-ray is so nice that many people will think of putting them on their iPod or iPhone. It is possible that if you have a nice Blu Ray Ripper and maybe an
iPod Transfer and
iPhone Transfer


Part 1: How to Rip Blu Ray DVD movies to iPod iPhone video format?

Before you run this blu-ray ripper you need to install any dvd
Here is a free download link:
http://static.slysoft.com/SetupAnyDVD.exe

Step 1: Load your BD

Load your BD disc in to your blu-ray driver.


Step 2: Output Profile

Choose your output profile from the drop-down list according to your need. You choose output

format as the generatoin of your iPod and iPhone.
You can also set the specific settings of your output video, such as ''resolution'“video

bitrate” “encoder” and so on.

After you have done all the tings above, you need to click the start button to convert your blu-ray disc.

Tips:

You can also do many video editing works about your output video.

1. Effect:
You can adjust the “Brightness”, “Contrast”, “Saturation” of your output video and also you can select to use
the “deinterlacing” function which make your video more enjoyable.
2. Trim
To pick up any part of your BD movie to converter, you can use “Trim” function.
3. Crop
You can choose any play area to convert by using the Crop function.
4. Watermark
You can add your own watermark on the output video, the watermark can be words and also picture. You can choose the font of your words and other really enjoyable function

Part 2: How to Put Your Movies on Your iPod iPhone?

Step 1: Run iPod Transfer and Plug your iPod or iPhone to your computer

This powerful iPod Transfer can recognize your iPod or iPhone automatically and show the info of your iPod or iPhone on the interface.

Step 2: Choose the movie

Click the "Computer to iPod/iPhone" button and you are allowed to choose file and folder.

You just need to find your converted movie on your computer and click ok. Your movie will be delivered to your iPod or iPhone directly.

2011年7月17日星期日

How to Rip DVD, Convert Video, Backup iPod info,Make iPhone Ringtone, Copy DVD on Mac

Two years ago, I had my first Mac. Today I get my new MacBook Pro. So I am totally a Mac fan now. I enjoy my Mac very much. I always watch movies on my Mac and sometimes rip my DVD movies on it and convert video to another format. Also I make my own iPhone ringtone on it. And recently, I copy my DVDs on it as well. Now I will share my experience with you.

My article includes 5 part:
Part 1. How to rip DVD to video format on Mac
Part 2. How to convert video on Mac
Part 3. How to transfer info between iPod and Mac
Part 4. How to make iPhone ringtone on Mac
Part 5. How to copy DVD on Mac

Before we get start, I want to introduce you a really powerful tool:
Aiseesoft DVD Software Toolkit for Mac. It can do what I said above easily.

Part 1. How to rip DVD on Mac
Just click DVD Ripper for Mac on the main interface.

Step 1. Load you DVD.
Click the “Load DVD” button(a), find the DVD folder of the movie you want to add from your DVD-ROM, and Click “Open”.

Tick the check boxes(b) before the titles and chapters that you want to rip.

Step 2. Chose output profile and settings.
Selecting output format is really easy, you can chose your output format according to your devices players and the default setting works great.

Tips: Sample rate (Hz) = any value up to 48000 (higher value = better sound quality = bigger file)
Bitrate (kbps) = any value up to 160 (higher value = better sound quality = bigger file)
After setting your own output and settings you can click “Start” button to start your conversion. (The time of the conversion depends on your DVD and the settings you chose.)

Part 2. How to convert video on Mac
Click Video Converter for Mac on the interface.


Step 1. Load video
Easily click “Add File” to load your video that you want to convert.

Step 2. Choose output profile and settings
At the bottom of the interface there are a drop-download list named “profile”. You can choose your output format here.

You can also adjust the settings of your output video, such as Resolution, Bit rate and so on.
After you finish the 2 steps, you can just click “Start” button to start your conversion.

Part 3. How to transfer info iPod and Mac
Use iPod Manager for Mac

Step 1. Plug your iPod to your Mac
Aiseesoft iPod Manager for Mac can find it automatically.

Step 2.
a. if you want to transfer music and videos from iPod to Mac

Pick up what you want to backup
Just click Music and all of your music on your iPod will be listed, so you can pick up which songs you want to transfer. (Click “Video”/“Picture”, if you want to backup your videos and image.)

Click “iPod to Mac” and find where to put your iPod info on your Mac and click “Open”

b. if you want to put music and videos from Mac to iPod.
1. Click “Music”
2. Click “Mac to iPod” and pick up the songs on your Mac you want to put on your iPod and click “Open”
(If you want to put video/image, just click “Video”/“Picture” and other operation is the same as putting songs)

Part 4. How to make iPhone ringtone on Mac

Click iPhone Ringtone Maker for Mac on the main interface.

Step 1: Click “Browse” on the right side of "Input File" to import the file that you want to make ringtone from it.

Step 2: Play it and listen the music to find the segment that you want to use it as ringtone. Then drag and click the start & end slider to set your wanted segment, or type the start & end time in the corresponding text box directly to get the exact segment. You also can pre-listen the converted audio before generate.

Step 3: Click “Browse” on the right side of "Local Output Folder" to choose the output destination.

Step 4: Check "Export to iPhone" option, the converted ringtone will be load to your iPhone directly.
[b]Step 5[/b]: After all the settings are finished, click “Generate” to begin making your own iPhone ringtone.

Key function
● Convert any video to iPhone ringtone M4R
● Create iPhone ringtone from any audio files
● Get any clips from video and audio
Edit Added iPhone ringtones

Part 5. How to copy DVD on Mac
You need to use DVD Copy for Mac.


Step 1. Load Your Source
This excellent DVD copy for Mac allows you to load DVD folder and DVD image ISO.

Step 2. Choose Output Info
1. “Full Disc” or “Main Movie”
This DVD copy for Mac enables you to copy the full disc and also the main movie according to your need.

2. “Audio”, “Subtitle” and “Volume” name
You can choose your output audio from the “Audio” drop-down list, such as “all audio”/ “None”/ or some audio the DVD provide.

Subtitle is always an important thing, you can choose your output subtitle in “Subtitle” drop-down list.

You can also name your output volume's name

Step 3. Choose Your Target
You can copy your DVD to another DVD disc, DVD folder or DVD image ISO.

Tips:
1. You can also choose to copy the menus or not.
2. All the info you choose will be dispalyed on the “Info Box”.

2011年7月16日星期六

How to convert video for your Android phone?

Android phones, such as HTC, Motorola, Samsung, LG, Sony Ericsson, etc. are rapidly gaining in popularity these days. If you have got the Android phone and want to enjoy videos on your Android phone, you need the assistant of a professional video to Android phone converter. Aiseesoft Android Video Converter is the ideal solution for converting all popular HD and general video files, such as H.264/ AVC, AVCHD, MTS, M2TS, TS, HD MKV, HD WMV, AVI, WMV, ASF, MKV, MOV, MPG, 3GP, 3GP2 and more, to your Android devices formats on your computer.

Note: For Mac users, please try Android Video Converter for Mac.

The following guide shows you how to convert video for popular Android phones, including HTC Legend, Motorola Droid, Samsung Galaxy, LG Ally and etc.

Step 1: Add video source

Load your videos by clicking the "Add Video" button. Also you can just drag and drop your video source to the Android Video Converter.

add video to android video converter

Aiseesoft Android Video Converter supports converting most popular video files, like MKV, WMV, AVI, FLV, 3GP, DivX, VOB and even HD video, to Android phone.

Step 2: Select the output format

Click the drop-down arrow on the right of the "Profile". There are several built-in profiles for popular devices. You can choose the output format according to your Android phone. Here we take MP4 as an example. You just need to choose the "Android > Android MP4 Video (*.mp4)" option.

choose MP4 for output android video

After selecting the target profile, you can also set some properties for special needs. Click the "Settings" button to do some further video and audio settings.

set output parameters

Step 3: Convert video to Android format

If you have done all these settings, just click "Convert" button to start converting your video to the Android format you select. And the converting progress will be finished within minutes.

convert video to android phone

Step 4: Import the output video to Android phone

Now, connect your Android mobile phone to computer and transfer the output videos to Android phone. Then you can enjoy the HD movies, popular TV shows and other interesting videos on your fancy Android phone.

Tips: This wonderful Android Phone Video Converter also possesses powerful video editing features. You can trim video segment, crop frame, join videos together, add watermark, and so on

Total Video Converter

2011年7月14日星期四

How to Copy DVD/ISO image/DVD Folder to DVD/ISO image/DVD Folder for Windows/Mac

When you have bunches of DVD movies, it is really hard to take care of them. The disc is really easy to break. So make a copy of your DVD movies to another DVD disc or ISO image or DVD Folder. How?
When you have bunches of DVD movies, your friends must come and borrow your movies to watch. How to protect your movie disc from being broken? Borrow them a copy?
How?
When your family have a party and it is really sweet, everyone wants to have a copy of the party's video. But they make only one DVD of it. How to make everyone has the record of the happy time? Copy the DVD.
How?

These problems are easy to solve now, if you have this powerful DVD Copy Software.
It can help you to make copys of your DVD. If you want to backup your DVD movies, you can choose to copy the full disc or the main movie. It can also copy a DVD to ISO image and DVD Folder on your computer. Also it can copy your ISO image or DVD Folder to a DVD disc to play in DVD player.

Here is a simple guide for you to follow:
For Windows users:


Step 1 Choose Source:
The source of this DVD copy software can be:
1: DVD disc
2: ISO image
3: DVD Folder
Tip 1: The specific information of the DVD disc will be shown on the top-left of the interface.

Step 2. Preparation
Before you click the “Start” button,
1. You can choose to copy the full disc or the main movie.
2. You can choose the audio, subtitle of the copy.
3. You can change the name of the volume.
4. You can choose to “include menu” or “skip menu” or neither of them.

Step 3. Choose Target:
You can save your DVD movie as:
1: DVD disc
2: DVD Folder
3: ISO Image File

Step 4: Start Copy


Click “Start” button to start the copy.

Tip 2:
You can change the “Preference”, when you click “Edit” button.

For Mac users:

This DVD Copy for Mac software is the best DVD copy for Mac users.
Let's begin to copy DVDs:
Step 1: Download and install DVD Copy for Mac


Step 2: Load Your Source
This excellent DVD copy for Mac allows you to load DVD folder and DVD image ISO.

Step 3: Choose Output Info
1. “Full Disc” or “Main Movie”
This DVD copy for Mac enables you to copy the full disc and also the main movie according to your need.

2. “Audio”, “Subtitle” and “Volume” name
You can choose your output audio from the “Audio” drop-down list, such as “all audio”/ “None”/ or some audio the DVD provide.

Subtitle is always an important thing, you can choose your output subtitle in “Subtitle” drop-down list.

You can also name your output volume's name

Step 4: Choose Your Target
You can copy your DVD to another DVD disc, DVD folder or DVD image ISO.

Tips:
1. You can also choose to copy the menus or not.
2. All the info you choose will be displayed on the “Info Box”.

2011年7月13日星期三

How to Make iPhone Ringtone From DVD Music/Music/Video?

People want to show their individuality anytime and anywhere with their inimitable hairstyle, clothing, and other things. Your phone's ringtone is also really important to show your difference from others. So how to make your own unique ringtone for your incoming calls, clock alarms, clock timer becomes a really important thing.

Today I will show you how to make your own iPhone ringtones from your DVD/video/music. Someone will say that you can buy them on itunes. Yes, everybody can buy it. It is not unique and special. Let's make our own iPhone ringtone together.

Things you need:
1. DVD/video/audio files that contains the music you want
2.iPhone Ringtone Maker
3. Computer(Windows/Mac)


Step 1: Load File/DVD
Load your video/audio files or DVD to this iPhone Ringtone Maker

Step 2: Choose music
You need to choose which part you want to convert as your iPhone ringtone or you want to make the whole files as your iPhone ringtone. Just drag the bar to set the begin point and end point

Step 3: Pre-listening
You can pre-listening the ringtone, if you do not like it you can adjust the length of your ringtone.

Step 4: Make Ringtone
After you have done all the tings above, you can click “Generate” button to start the conversion.
Soon you will get your own ringtone.

Tips:
1. if you want to put your ringtone directly to your iPhone, please check the box before “import to iPhone”.

2. if you want to manage your ringtone, you can click “manage ringtone” button to do it easily.

For Mac users, you can use
iPhone Ringtone Maker for Mac to do this easily with the same operation as windows one.

To help you to make your iPhone and iPod more enjoyable here I also recommend you this
DVD to iPhone Converter

2011年7月12日星期二

How to Convert DVD and Video to Any Video Format You Want Freely

Convert DVD and video is really easy for most of people now. You just need a DVD converter and a video converter. Use dvd converter to convert your DVD and use video converter to convert video. Do you want only one converter that can help you to convert both DVD and video in one interface with few clicks and high output quality. Today I will introduce you a Total Media Converter that convert both DVD and video.

You need to download and install it first before you can use it.

Step 1: Load DVD/Video
Click “Add File” to load Videos from your computer
Click “Load DVD” to load your DVD from your DVD Drive


Step 2: Choose Output Info
a. Convert video:
Choose output profile first in the drop-down list and then click “settings” button to adjust the specific settings, such as “resolution”, “encoder”, “bit rate”, “frame rate” and some audio settings such as “audio encoder”, “sample rate” and so on. You can save your profile and settings and give it a name, so you can use it next time easily.


b. Convert DVD
Choose output profile first and then you need to choose your output audio track and subtitle, if you do not want them you can leave them blank. Also like convert video you can adjust the specific output settings, such as “resolution”, “bit rate” and so on.
Save the profile and settings for next use is also available.

Step 3: Conversion
Click “Convert” button to start your conversion. You will get your output video soon.

Tips:
1. Adjust the output effect
You are allowed to adjust the “Brightness”, “Contrast” and “Saturation” of the output video. “Deinterlacing” is also available to improve the quality of the output video. You can choose “apply to all” to save your time.

2. Pick up a part to convert
If you do not want to convert the whole video or DVD you can just pick up the part that you want to convert using “Trim” function.
You can do it in 3 ways:
a: Enter the start time in the Start Time box and click OK, then enter the end time in the Set End Time box and click OK.
b: Drag the scissors bars under the preview window when you want to trim, then the time will be shown in the Start Time box and End Time box for your reference.
c: While playing video, click “Trim From” button where you want to begin your trimming and click “Trim To” button where you want to stop your trimming.

3. Crop the output video
This powerful video converter allows you to crop the video play area. You can choose a certain play area to convert, and do snapshot.
You can crop your output video in 2 ways:
a: Crop by adjusting the crop frame
The crop frame is the yellow line around the movie video. There are eight small adjustment boxes on the crop frame. Each adjustment box allows you to crop the movie video from a different position. To crop your movie video, you can just move your mouse cursor to an adjustment box and drag the crop frame.
b: Crop by setting the crop values
There are four crop values on the buttom of the window: Left, Top, Right, Bottom. You can set each value to crop your movie video, and the crop frame will move accordingly.

You can also set the output aspect ratio from the Zoom Mode according to your need. There are four choices available: Keep Original, Full Screen, 16:9 and 4:3.

4. Add watermark to the output video
You can add text and picture watermark to your output video easily with Aiseesoft Total Media Converter.
Check the “Enable Watermark” box and choose “Text” or “Picture” as you want.
You can drag the watermark to find the place you want to put and also you can adjust the Font info of the words you from “T” button.

2011年7月11日星期一

How to Rip DVD, Convert video and Backup your video/audio files on ipod on Mac

Until three months ago, I’ve been being a windows user, and I’m quite good at how to enjoy dvd/ various video on my windows. While, I received a birthday present—an Apple Macbook, from my parent, and at the beginning, it’s really suffering to get used. I don’t know how to enjoy DVD, Video, even can’t backup my ipod’s stuff.
Fortunately, few days ago, I found some useful tools to solve all my problems.
Here, I want to share these experience with more friends.

First, I want to tell this article including three parts:
Part One: How to rip DVD to various video formats on Mac?
Part Two: How to convert video to what you wanted on Mac?
Part Three: How to backup your ipod stuff on Mac?


Ok, let me explain one by one.

Part One: How to rip DVD to various video formats on Mac?
Now, I’m using Aiseesoft DVD Ripper for Macto do that.
It provides a best and easy to rip dvd to various video formats, so you can enjoy dvd on your portable devices, such as: iPod, iPhone, PSP, Zune. etc
It’s easy to use, just few click:
Step 0: Download and install the dvd ripper for mac, and you will see the interface as follows:


Step 1: Place the DVD into your DVD drive and click the “Load DVD” button to load DVD.
Step 2: Select video formats from "Profile" drop-download list
Step 3: Set the special settings such as "trim","effect",etc to cater to your need and click "Start" to start your conversion.

Part Two: How to convert video to what you wanted on Mac?
You just need AiseesoftVideo Converter for Macto help you.
And I don’t want to talk more, you just can have a try by yourself

Here is how to use it:
Step 0: Download and install this video converter for mac. And you can see the following interface


Step 1: Click the "Add File" button to load your video
Step 2: Select the output profile and output Video settions.
You can cut a clip of your video by using its "Trim" function
You can merge a few videos into one file by clicking "merge into one file"
You can crop the black edge of your video to adjust your video to your iPod screen to get the best view.

Then click the "Convert" button to sart the conversion.


Part Three: How to backup your ipod stuff on Mac?
Easy to solve this problem too.
AiseesoftiPod to Mac Transfercan copy your selected video, audio and image files to your Mac immediately without any loss
Ok, just few clicks, you will finish the work.
Step 0: You need download Aiseeosft iPod to Computer Transfer


Step 1: Plug your iPod to your Mac, and pick up what you want to backup
Step 2: Click “iPod to Mac” and find where to put your iPod info on your Mac and click “Open”
Few seconds later, your iPod songs will be on your Mac.

2011年7月10日星期日

How to convert HD video to MP4/YouTube/MPEG video

Maybe some people will ask: what is HD video and why it can be widely used?
Answer:
High-definition video or HD video refers to any video system of higher resolution than standard-definition (SD) video, and most commonly involves display resolutions of 1280×720 pixels (720p) or 1920×1080 pixels (1080i/1080p).
Nowdays, HD is becoming more and more popular as the following reasons:
1.HD DVDS, together with equipment to play and record them, are available now, stimulating the public appetite for HD.
2.PC displays with HD quality potential are becoming widely used, which will acclimatise the public to HD.
3.Large flat LCD screen with HD resolution are becoming readily available at prices which the public seems prepares to pay, providing the means to view HD.

While, HD video also has some inconvenience to use, such as, we can’t edit them
in Windows Movie Maker or some other edit software; can’t put them into portable devices directly , like iPod, iPhone, Zune, Creative Zen and so on; can’t share videos with friends on youtube, myspace and other online video website. etc.

Here, I’ll introduce a wonferful tool to solve this problem.
Aiseesoft HD Converter has three uses:
Convert HD video to general video;
Convert general video to HD video;
Convert among HD videos.

So with it, you can enjoy HD video at will.

The following is a simple guide for you:
Step 0: Download, install and run Aiseesoft HD Video Converter.


Step 1: Load Video
Click “Add File” to load the video that you want
Step 2: Choose Your Output Profile and Settings
From “Profile” drop-down list you can choose your output profile according to your need.
You can also click “setteing”adjust the settings of your output video, such as “video/audio encoder”, “Video/audio Bitrate”, “Channels”, “Resolution” and so on..
Step 3: Video Editing
This powerful MTS Converter allows you to do many video editings.
1. Click "Effect" to make special effect for your movie.
You can adjust the “Brightness”, “Contrast”, “Saturation” and also you can use “deinterlacing” to improve you output effect.

2. Trim:
“Trim” function allows you to pick up any part of your video to convert. You can just convert a part of your video that you want.

3: Crop:
Cut off the black edges of the original movie video and watch in full screen on your iPod using the "Crop" function.

Step 4: Conversion
After you have done all the steps above you can click “Start” button to start your conversion.

Tip 3:
Here i also recommend you guys a really nice TS Video Converter, which can convert TS file to all the popular standard video and to other HD video easily. It can also do many video editing works, such as trim, crop, merge and so on. It has super fast conversion speed and high output quality.
MTS Converter is also a really nice tool to convert MTS video file to enable you to edit in windows movie maker and other video editing software. And also allows you to upload your HD video to youtube.com to share with your friends. It can convert MTS file to iPod, iPhone, Zune, PSP, Creative Zen, Xbox video.

2011年7月8日星期五

How to rip Blu-ray to WebM video?

WebM (consists of VP8 video and Vorbis audio streams) is free and open media file format sponsored by Google for use with HTML5 video. The WebM is actually a video compression format based on a profile of Matroska. This promising format is very likely to dominate the video world in the future. Now you can find WebM on YouTube, Google Video, NicoVideo, Daily Motion, MetaCafe, and Revver Video and many more. And in the near future, the WebM will be also supported by mobile phones, tablets and other devices.

Now, if you want to convert your Blu-ray movie to WebM video for sharing it online, you need a professional Blu-ray to WebM Ripper. Aiseesoft Blu-ray Ripper is exactly the converting tool to help you rip your Blu-ray disc to WebM with outstanding output video effect. Now I will show you how to rip Blu-ray to WebM video step by step.

First, you need download this Blu-ray to WebM Ripper and install it on your computer.

Step 1: Load Blu-ray disc

After running the software, you could see the interface as below. Click the "Load Blu-ray" button to load any Blu-ray disc you want to rip.

Step 2: Edit output video effect

Aiseesoft Blu-ray to WebM Ripper possesses powerful video editing features. With it, you can cut off any segment from your Blu-ray movie, crop video frame, watermark video, modify video brightness/saturation/contrast/hue/volume, and join Blu-ray playlists together.

Step 3: Choose output profile

After the video editing operation, you can choose your desired WebM format from the drop-down list. Here, you can select the SD WebM format or the HD WebM format according to your need.

Moreover, this Blu-ray to WebM Ripper allows users to do some settings on the output video file. Users can adjust Video Encoder, Frame Rate, Video Bitrate, Audio Encoder, Sample Rate, Channel, and Audio Bitrate.

Step 4: Start Blu-ray to WebM conversion

After all these operations above, you can click on the "Convert" button to start ripping Blu-ray to WebM. And you could enjoy your output WebM video or upload it to websites.

2011年7月7日星期四

Aiseesoft Updates Blu-ray Ripper to Support WebM

The WebM format is a free and open media file format sponsored by Google. It is actually a video compression format consisting of VP8 video and Vorbis audio streams. Now this WebM format has been used in YouTube, Google video and other online video websites. Now, Aiseesoft Blu-ray Ripper has been updated to support ripping Blu-ray disc to WebM with perfect output quality. This Blu-ray Ripper could remove different copy protections of your commercial BD discs, like AACS, BD+, even MKB V24. Then users can conveniently rip the Blu-ray movie to WebM and any other popular video format.

Besides of supporting outputting WebM video, Aiseesoft Blu-ray Ripper also offers some other new features:

  • Improve the file parsing speed;
  • Support the DE, WAV, CUE (including CUE+APE、CUE+WAV、CUE+FLAC) files;
  • Improve the TS file decoding technology;
  • Update the FLAC decoder;
  • Improve the DVD parsing ability;
  • Support 5.1 Dolby surround sound;
  • Improve the “Crop” and “Merge” features;

Also this Blu-ray Ripper owns powerful video editing features to help you customize output video effect. With it, users can conveniently trim video length, crop video frame, watermark video, join Blu-ray playlists together and adjust video brightness, saturation, contrast, hue and volume.

Aiseesoft Blu-ray Ripper is the best Blu-ray ripping software to help you rip any Blu-ray to video with super high ripping speed.

if you own an iPad, maybe you need a Blu-Ray to iPad Ripper

hope my artical is helpful for you.

2011年7月5日星期二

How to transfer music between iPod and Mac without iTunes

Most iPod users are not very good at using iTunes. It is very difficult to use, and you can not transfer your songs back to your computer when your computer crashed down, if it is not purchased from Apple Store. So I had not used iTunes for a long time on my Mac since I found Aiseesoft
iPod Manager for Mac

It can both backup your iPod songs, movie/video and image on your Mac and import your local files to your iPod anytime without worrying loosing other info.
This article aims to show Mac users how to import files to iPod without iTunes and backup iPod info on Mac.

Part 1: How to import songs/video/movie/image to iPod without iTunes. (Take put songs for example)
Step 1: Download and run Aiseesoft iPod Manager for Mac.

For Intel: http://www.aiseesoft.com/downloads/mac/ipod-manager-for-mac.dmg
For Power PC: http://www.aiseesoft.com/downloads/mac/ipod-manager-for-mac.dmg

Step 2: Plug your iPod to your Mac
Aiseesoft iPod Manager for Mac can find it automatically.


Step 3: Pick up the files you want to put on your iPod
1. Click “Music”
2. Click “Mac to iPod” and pick up the songs on your Mac you want to put on your iPod and click “Open”

Few seconds later, it will on your iPod.
(If you want to put video/image, just click “Video”/“Picture” and other operation is the same as putting songs)

Part 2: How to backup iPod info on Mac
Step 1: Plug your iPod to your Mac
Aiseesoft iPod Manager for Mac can find it automatically.

Step 2: Pick up what you want to backup
Just click Music and all of your music on your iPod will be listed, so you can pick up which songs you want to transfer. (Click “Video”/“Picture”, if you want to backup your videos and image.)

Step 3: Click “iPod to Mac” and find where to put your iPod info on your Mac and click “Open”

Few seconds later, your iPod songs will be on your Mac.

2011年7月3日星期日

How to convert mod to wmv/avi/mp4/mov/mpg for Mac/Windows

Nowdays, more and more people use camcorder to record something happy, such as birthday party, wedding, graduation etc. While, maybe lots of you aren’t familiar with these tools, feeling frustrated about how to convert and import properly those .MOD video files. Now here, I give some little tips and hope it useful to all of you.

First, what’s Mod?

.Mod files are actually MPEG-2 files with AC3 audio, similar to a VOB file on a DVD or the M2T files used on Sony hard drive camcorders, this video file format is used on many digital camcorders, such as the JVC Everio, the Canon FS100 and the Panasonic D-Snap SD-card camcorders.

Second, why and how we convert them to what we wanted video formats?

Because .Mod file is not supported by iPod Touch, iPod Nano, iPod Classic, iPhone, Apple TV, PSP, Zune, Creative Zen etc, so if you want to import MOD files from your camcorders to play on iPod, even burn to DVD to keep them, you have to convert them.
Here, I’ll share you with a useful tool to solve this problem.
Part one: For Mac users:

Aiseesoft Mod Converter for Mac can help you convert Panasonic/JVC/Cannon etc. Mod file to AVI, convert Mod to FLV, MPG, MP4, MOV, FLV, 3GP, etc., then you can enjoy edit them, enjoy them on your portable devices.

Now, follow the step-by-step guide and start the conversion.

Step 0: Download, install and run Aiseesoft Mod Converter for Mac
And after a while, you can see the following inferface:


Step 1: Load Video:
Click “Add File” button to browse your computer hard disc and load the MOD/TOD video files you want to convert to the software

Step 2: Set output video format
Click “Profile” button from the drop-down list to select the output video format such as AVI, MPG, MPEG and WMV. You can click the “Settings” button to set parameters of your output video such as Frame Rate, Bitrate to get the best video quality as you want.

Step 3: Click the “Start” button to start the conversion.

Tips:
This Mac Mod Converter also provides you with a series of video editing functions, such as crop video size, trim a clip of video, and merge several videos, set video effect.

1. Click "Effect" to make special effect for your movie.

You can adjust the “Brightness”, “Contrast”, “Saturation” and also you can use “deinterlacing” to improve you output effect.

2. Trim:
“Trim” function allows you to pick up any part of your video to convert. You can just convert a part of your video that you want.

3: Crop:
Cut off the black edges of the original movie video and watch in full screen on your iPod using the "Crop" function.

4. Merge into one file
If you want to merge several Mod/Tod videos into one file you can choose them and click the “Merge into one file” to do it

Part two: For windows users:

Aiseesoft Mod Converter has the same function

Step 0: Download, install and run Aiseesoft Mod Converter


Step 1: Click “Add File” button to add your video files
Step 2: Set output video format
Step 3: Click the “Start” button to start the conversion.


Tips:
This powerful Mod Converter also allows you to do many editing works, such as “Trim”, “Crop” and “Effect”

After you convert MOD/TOD Video files with Aiseesoft Mod Converter, you can import MOD Movie from your camcorders to Windows Movie Maker, iPod, Zune, etc without problem.

2011年7月1日星期五

How to Transfer Files from PC to Your iPhone?

Aiseesoft iPhone Transfer is one advanced iPhone tool for iPhone 3G, iPhone 3GS, iPhone 4 users. Working as powerful and professional iPhone transfer software, it can transfer from PC to iPhone directly without iTunes. Backup files from iPhone to local disk without loss. Transfer files between two different iPhone.

All of these needs can be met with this only one iPhone Transfer. Because iPod and iPhone have the same function in the field of multimedia, this iPhone Transfer is also applied to iPod.

Next let us learn how to transfer files from PC to your iPhone with Aiseesoft iPhone Transfer.

Step 1: Download and install Aiseesoft iPhone Transfer.

The interface is like:

Step 2: Run the software, and connect your iPhone/iPod to your computer via USB cable.

Step 3: Transfer files

Click PC to iPhone to seek the files or folders that you want to import to iPhone and click OK. The process of transferring will be finished instantly.

Besides, Aiseesoft iPhone Transfer can transfer all video and audio files or folders accepted by iPhone. These formats include MP4, M4V, MP3, WMV. Strong search function can find files you need easily. Possessed of friendly user-interface, it is easy to operate, even for the new users. Just connect it with your iPhone, all the process can be finished in few clicks.

Want to transfer from PC to iPhone fast and conveniently, please try easy-to-use Aiseesoft iPhone Transfer. More information at: Transfer from PC to iPhone.