DVD is the first choice for many people when they want to watch movies at home. It has high quality picture, different subtitles and audio tracks and most important, some of the DVD movies are more enjoyable than than the cinema one.
However, when we travel, when the disc is broken, when we want to backup the DVD movies, when we want to share the movies with friends, when we want to make usage of the movie, what should we do?
Convert DVD to video video formats you need.
This guide aims to show you how to convert DVD to different video format both for windows/mac users.
Part 1: How to Convert DVD on Windows with DVD Ripper
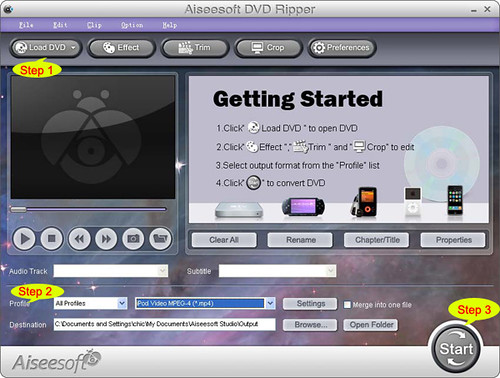
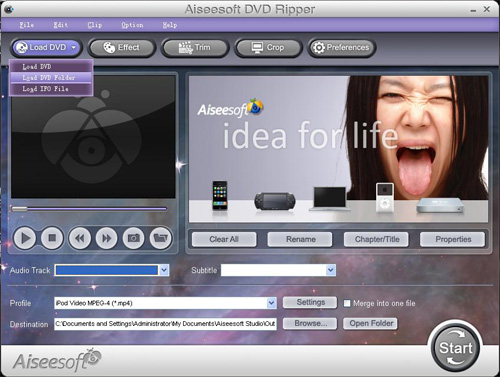
Step 1: Load DVD
Put your DVD to your DVD Drive and click “Load DVD” button to add your DVD
Step 2: Choose Profile
Choose your output video profile from a drop-down list.
Step 3: Start Conversion
Part 2: How to Convert DVD on Mac with DVD Ripper for Mac
Step 1: Load DVD
Click the “Load DVD” button, find the DVD folder of the movie you want to add from your DVD-ROM, and Click “Open”.
Step 2: Choose output profile and settings
Selecting output format is really easy, you can chose your output format according to your devices players and the default setting works great.
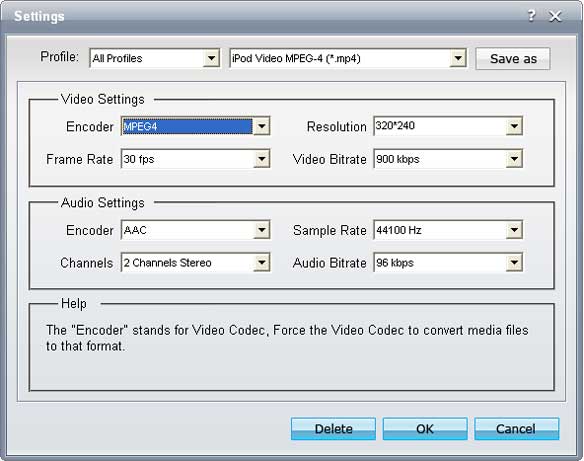
For a veteran of digital player, you could customize your own settings by clicking “Settings” button to chose your own video resolution, frame rate, bit rate, encoder, etc.
Step 3: Start Conversion
If you want to convert both DVD and videos, here is a really powerful DVD Converter Suite. It can help you to convert DVD and videos easily. It can also help you to backup the iPod music and videos to your computer.
2012年1月13日星期五
Full Guide: How to Convert DVD to MP4, AVI, 3GP, iPod ......
DVD is the first choice for many people when they want to watch movies at home. It has high quality picture, different subtitles and audio tracks and most important, some of the DVD movies are more enjoyable than than the cinema one.
However, when we travel, when the disc is broken, when we want to backup the DVD movies, when we want to share the movies with friends, when we want to make usage of the movie, what should we do?
Convert DVD to video video formats you need.
This guide aims to show you how to convert DVD to different video format both for windows/mac users.
Part 1: How to Convert DVD on Windows with DVD Ripper
Step 1: Load DVD
Put your DVD to your DVD Drive and click “Load DVD” button to add your DVD
Step 2: Choose Profile
Choose your output video profile from a drop-down list.
Step 3: Start Conversion
Part 2: How to Convert DVD on Mac with DVD Ripper for Mac

Step 1: Load DVD
Click the “Load DVD” button, find the DVD folder of the movie you want to add from your DVD-ROM, and Click “Open”.
Step 2: Choose output profile and settings
Selecting output format is really easy, you can chose your output format according to your devices players and the default setting works great.
For a veteran of digital player, you could customize your own settings by clicking “Settings” button to chose your own video resolution, frame rate, bit rate, encoder, etc.
Step 3: Start Conversion
If you want to convert both DVD and videos, here is a really powerful DVD Converter Suite. It can help you to convert DVD and videos easily. It can also help you to backup the iPod music and videos to your computer.
However, when we travel, when the disc is broken, when we want to backup the DVD movies, when we want to share the movies with friends, when we want to make usage of the movie, what should we do?
Convert DVD to video video formats you need.
This guide aims to show you how to convert DVD to different video format both for windows/mac users.
Part 1: How to Convert DVD on Windows with DVD Ripper
Step 1: Load DVD
Put your DVD to your DVD Drive and click “Load DVD” button to add your DVD
Step 2: Choose Profile
Choose your output video profile from a drop-down list.
Step 3: Start Conversion
Part 2: How to Convert DVD on Mac with DVD Ripper for Mac
Step 1: Load DVD
Click the “Load DVD” button, find the DVD folder of the movie you want to add from your DVD-ROM, and Click “Open”.
Step 2: Choose output profile and settings
Selecting output format is really easy, you can chose your output format according to your devices players and the default setting works great.
For a veteran of digital player, you could customize your own settings by clicking “Settings” button to chose your own video resolution, frame rate, bit rate, encoder, etc.
Step 3: Start Conversion
If you want to convert both DVD and videos, here is a really powerful DVD Converter Suite. It can help you to convert DVD and videos easily. It can also help you to backup the iPod music and videos to your computer.
2011年11月23日星期三
Full Guide: How to Convert DVD to MP4, AVI, 3GP, iPod ......
DVD is the first choice for many people when they want to watch movies at home. It has high quality picture, different subtitles and audio tracks and most important, some of the DVD movies are more enjoyable than than the cinema one.
However, when we travel, when the disc is broken, when we want to backup the DVD movies, when we want to share the movies with friends, when we want to make usage of the movie, what should we do?
Convert DVD to video video formats you need.
This guide aims to show you how to convert DVD to different video format both for windows/mac users.
Part 1: How to Convert DVD on Windows with DVD Ripper
Step 1: Load DVD
Put your DVD to your DVD Drive and click “Load DVD” button to add your DVD
Step 2: Choose Profile
Choose your output video profile from a drop-down list.
Step 3: Start Conversion
Part 2: How to Convert DVD on Mac with DVD Ripper for Mac
Step 1: Load DVD
Click the “Load DVD” button, find the DVD folder of the movie you want to add from your DVD-ROM, and Click “Open”.
Step 2: Choose output profile and settings
Selecting output format is really easy, you can chose your output format according to your devices players and the default setting works great.
For a veteran of digital player, you could customize your own settings by clicking “Settings” button to chose your own video resolution, frame rate, bit rate, encoder, etc.
Step 3: Start Conversion
If you want to convert both DVD and videos, here is a really powerful DVD Converter Suite. It can help you to convert DVD and videos easily. It can also help you to backup the iPod music and videos to your computer.
2011年11月10日星期四
Full Guide: How to Convert DVD to MP4, AVI, 3GP, iPod ......
DVD is the first choice for many people when they want to watch movies at home. It has high quality picture, different subtitles and audio tracks and most important, some of the DVD movies are more enjoyable than than the cinema one.
However, when we travel, when the disc is broken, when we want to backup the DVD movies, when we want to share the movies with friends, when we want to make usage of the movie, what should we do?
Convert DVD to video video formats you need.
This guide aims to show you how to convert DVD to different video format both for windows/mac users.
Part 1: How to Convert DVD on Windows with DVD Ripper
Step 1: Load DVD
Put your DVD to your DVD Drive and click “Load DVD” button to add your DVD
Step 2: Choose Profile
Choose your output video profile from a drop-down list.
Step 3: Start Conversion
Part 2: How to Convert DVD on Mac with DVD Ripper for Mac
Step 1: Load DVD
Click the “Load DVD” button, find the DVD folder of the movie you want to add from your DVD-ROM, and Click “Open”.
Step 2: Choose output profile and settings
Selecting output format is really easy, you can chose your output format according to your devices players and the default setting works great.
For a veteran of digital player, you could customize your own settings by clicking “Settings” button to chose your own video resolution, frame rate, bit rate, encoder, etc.
Step 3: Start Conversion
If you want to convert both DVD and videos, here is a really powerful DVD Converter Suite . It can help you to convert DVD and videos easily. It can also help you to backup the iPod music and videos to your computer.
2011年10月10日星期一
Full Guide: How to Convert DVD to MP4, AVI, 3GP, iPod ......
DVD is the first choice for many people when they want to watch movies at home. It has high quality picture, different subtitles and audio tracks and most important, some of the DVD movies are more enjoyable than than the cinema one.
However, when we travel, when the disc is broken, when we want to backup the DVD movies, when we want to share the movies with friends, when we want to make usage of the movie, what should we do?
Convert DVD to video video formats you need.
This guide aims to show you how to convert DVD to different video format both for windows/mac users.
Part 1: How to Convert DVD on Windows with DVD Ripper
Step 1: Load DVD
Put your DVD to your DVD Drive and click “Load DVD” button to add your DVD
Step 2: Choose Profile
Choose your output video profile from a drop-down list.
Step 3: Start Conversion
Part 2: How to Convert DVD on Mac with DVD Ripper for Mac
Step 1: Load DVD
Click the “Load DVD” button, find the DVD folder of the movie you want to add from your DVD-ROM, and Click “Open”.
Step 2: Choose output profile and settings
Selecting output format is really easy, you can chose your output format according to your devices players and the default setting works great.
For a veteran of digital player, you could customize your own settings by clicking “Settings” button to chose your own video resolution, frame rate, bit rate, encoder, etc.
Step 3: Start Conversion
If you want to convert both DVD and videos, here is a really powerful DVD Converter Suite . It can help you to convert DVD and videos easily. It can also help you to backup the iPod music and videos to your computer.
However, when we travel, when the disc is broken, when we want to backup the DVD movies, when we want to share the movies with friends, when we want to make usage of the movie, what should we do?
Convert DVD to video video formats you need.
This guide aims to show you how to convert DVD to different video format both for windows/mac users.
Part 1: How to Convert DVD on Windows with DVD Ripper
Step 1: Load DVD
Put your DVD to your DVD Drive and click “Load DVD” button to add your DVD
Step 2: Choose Profile
Choose your output video profile from a drop-down list.
Step 3: Start Conversion
Part 2: How to Convert DVD on Mac with DVD Ripper for Mac
Step 1: Load DVD
Click the “Load DVD” button, find the DVD folder of the movie you want to add from your DVD-ROM, and Click “Open”.
Step 2: Choose output profile and settings
Selecting output format is really easy, you can chose your output format according to your devices players and the default setting works great.
For a veteran of digital player, you could customize your own settings by clicking “Settings” button to chose your own video resolution, frame rate, bit rate, encoder, etc.
Step 3: Start Conversion
If you want to convert both DVD and videos, here is a really powerful DVD Converter Suite . It can help you to convert DVD and videos easily. It can also help you to backup the iPod music and videos to your computer.
2011年9月26日星期一
How to Rip DVD(windows/mac), Copy DVD, Convert Video?
Every year, my family will have a big party and all the members will get together. We have a very nice time on each year's party. And from the year 2000, I record the party and share with my family. I enjoy the work very much, while when I share the video or the DVD, it is really a big problem. But now I can solve it with only a few clicks.
So I write this article to show you guys how to deal with dvd and video stuff.
Part 1: How to Rip DVD on Windows and Mac
First Let me explain what is rip DVD. When I talk about “Rip DVD”, it means I will convert DVD video/movie to video format and you can play the video/movie without the disc. Of course, the original DVD will not be hurt.
For Windows users:
You need a DVD Ripper.
Step 1: Load your DVD to it
Step 2: Choose output profile
Step 3: Start Conversion
For Mac users:
Step 1: Download DVD Ripper for Mac.

Step 2: Load you DVD
Step 3: Choose output profile
Step 4: Start Conversion
Part 2: How to Copy DVD video/movie to another DVD Disc
To Copy a DVD to a blank DVD Disc you need a DVD copy Software and a DVD +/- RW Drive and a blank DVD Disc.
Step 1. Choose Source:
The source of this DVD Copy software can be: DVD disc, ISO image file and DVD folder
Step 2. Preparation
Before you click the “Start” button,
1. You can choose to copy the full disc or the main movie.
2. You can choose the audio, subtitle of the copy.
3. You can change the name of the volume.
4. You can choose to “include menu” or “skip menu” or neither of them.
Step 3. Choose Target:
You can copy your source to 3 target: DVD disc, ISO image and DVD folder
Step 4: Start Copy
Part 3: How to Convert Video
Here you need a Video Converter to help you.
Step 1: Add Video
Step 2: Choose output profile
Step 3: Start Conversion
So I write this article to show you guys how to deal with dvd and video stuff.
Part 1: How to Rip DVD on Windows and Mac
First Let me explain what is rip DVD. When I talk about “Rip DVD”, it means I will convert DVD video/movie to video format and you can play the video/movie without the disc. Of course, the original DVD will not be hurt.
For Windows users:
You need a DVD Ripper.
Step 1: Load your DVD to it
Step 2: Choose output profile
Step 3: Start Conversion
For Mac users:
Step 1: Download DVD Ripper for Mac.
Step 2: Load you DVD
Step 3: Choose output profile
Step 4: Start Conversion
Part 2: How to Copy DVD video/movie to another DVD Disc
To Copy a DVD to a blank DVD Disc you need a DVD copy Software and a DVD +/- RW Drive and a blank DVD Disc.
Step 1. Choose Source:
The source of this DVD Copy software can be: DVD disc, ISO image file and DVD folder
Step 2. Preparation
Before you click the “Start” button,
1. You can choose to copy the full disc or the main movie.
2. You can choose the audio, subtitle of the copy.
3. You can change the name of the volume.
4. You can choose to “include menu” or “skip menu” or neither of them.
Step 3. Choose Target:
You can copy your source to 3 target: DVD disc, ISO image and DVD folder
Step 4: Start Copy
Part 3: How to Convert Video
Here you need a Video Converter to help you.
Step 1: Add Video
Step 2: Choose output profile
Step 3: Start Conversion
2011年9月21日星期三
How to Rip DVD(windows/mac), Copy DVD, Convert Video?
Every year, my family will have a big party and all the members will get together. We have a very nice time on each year's party. And from the year 2000, I record the party and share with my family. I enjoy the work very much, while when I share the video or the DVD, it is really a big problem. But now I can solve it with only a few clicks.
So I write this article to show you guys how to deal with dvd and video stuff.
Part 1: How to Rip DVD on Windows and Mac
First Let me explain what is rip DVD. When I talk about “Rip DVD”, it means I will convert DVD video/movie to video format and you can play the video/movie without the disc. Of course, the original DVD will not be hurt.
For Windows users:
You need a DVD Ripper.
Step 1: Load your DVD to it
Step 2: Choose output profile
Step 3: Start Conversion
For Mac users:
Step 1: Download DVD Ripper for Mac.
Step 2: Load you DVD
Step 3: Choose output profile
Step 4: Start Conversion
Part 2: How to Copy DVD video/movie to another DVD Disc
To Copy a DVD to a blank DVD Disc you need a DVD copy Software and a DVD +/- RW Drive and a blank DVD Disc.
Step 1. Choose Source:
The source of this DVD Copy software can be: DVD disc, ISO image file and DVD folder
Step 2. Preparation
Before you click the “Start” button,
1. You can choose to copy the full disc or the main movie.
2. You can choose the audio, subtitle of the copy.
3. You can change the name of the volume.
4. You can choose to “include menu” or “skip menu” or neither of them.
Step 3. Choose Target:
You can copy your source to 3 target: DVD disc, ISO image and DVD folder
Step 4: Start Copy
Part 3: How to Convert Video
Here you need a Video Converter to help you.
Step 1: Add Video
Step 2: Choose output profile
Step 3: Start Conversion
2011年5月24日星期二
Enjoy The Social Network 2010 with Aiseesoft DVD Ripper
Now, the 83rd Annual Academy Awards approaches. On January 25, 2011, The Social Network 2010 was nominated for best picture.
The Social Network 2010 is based on The Accidental Billionaires, and represents the story of Mark Zuckerberg, founders of the biggest SNS website – Facebook.
The original idea of Facebook comes from Zuckerberg’s difficulty in communicating with girls. After been dumped by his girlfriend, he invaded the school’s database and collected all photos of girl students, and created the webpage “Face Mash”, which enables users to choose is the most attractive girl. This website soon became popular among boys. Then Zuckerberg create Facebook, which is open to Harvard students at first. After accepting registrations of users outside Harvard, Facebook became a global social network quickly.
Ever-changing technology is rapidly changing the world, but it has no use in changing the weakness in people’s heart. In this film, the huge social network helps people get closer in the virtual world, but Mark Zuckerberg cannot establish any long-term relationship with people in reality.
If you are too busy to watch the Social Network 2010 in the movie theatre, you should rent or buy the DVD and enjoy it. This movie can make you have a new review on the online social network and the social life in reality.
For your better enjoyment of this interesting movie, Aiseesoft provides you with powerful DVD Ripping software. The DVD Ripper can help users rip any popular DVD file to most popular video formats for better enjoyment. And it can bring users best output quality and user experience. Besides of the basic converting functions, this DVD Ripper can also customize video effect. Users can trim video length, crop video frame, watermark video, join videos together, etc.

2011年5月5日星期四
How to Rip DVD(windows/mac), Copy DVD, Convert Video?
Every year, my family will have a big party and all the members will get together. We have a very nice time on each year's party. And from the year 2000, I record the party and share with my family. I enjoy the work very much, while when I share the video or the DVD, it is really a big problem. But now I can solve it with only a few clicks.
So I write this article to show you guys how to deal with dvd and video stuff.
Part 1: How to Rip DVD on Windows and Mac
First Let me explain what is rip DVD. When I talk about “Rip DVD”, it means I will convert DVD video/movie to video format and you can play the video/movie without the disc. Of course, the original DVD will not be hurt.
For Windows users:
You need a DVD Ripper.
Step 1: Load your DVD to it
Step 2: Choose output profile
Step 3: Start Conversion
For Mac users:
Step 1: Download DVD Ripper for Mac.
Step 2: Load you DVD
Step 3: Choose output profile
Step 4: Start Conversion
Part 2: How to Copy DVD video/movie to another DVD Disc
To Copy a DVD to a blank DVD Disc you need a DVD copy Software and a DVD +/- RW Drive and a blank DVD Disc.
Step 1. Choose Source:
The source of this DVD Copy software can be: DVD disc, ISO image file and DVD folder
Step 2. Preparation
Before you click the “Start” button,
1. You can choose to copy the full disc or the main movie.
2. You can choose the audio, subtitle of the copy.
3. You can change the name of the volume.
4. You can choose to “include menu” or “skip menu” or neither of them.
Step 3. Choose Target:
You can copy your source to 3 target: DVD disc, ISO image and DVD folder
Step 4: Start Copy
Part 3: How to Convert Video
Here you need a Video Converter to help you.

Step 1: Add Video
Step 2: Choose output profile
Step 3: Start Conversion
So I write this article to show you guys how to deal with dvd and video stuff.
Part 1: How to Rip DVD on Windows and Mac
First Let me explain what is rip DVD. When I talk about “Rip DVD”, it means I will convert DVD video/movie to video format and you can play the video/movie without the disc. Of course, the original DVD will not be hurt.
For Windows users:
You need a DVD Ripper.
Step 1: Load your DVD to it
Step 2: Choose output profile
Step 3: Start Conversion
For Mac users:
Step 1: Download DVD Ripper for Mac.
Step 2: Load you DVD
Step 3: Choose output profile
Step 4: Start Conversion
Part 2: How to Copy DVD video/movie to another DVD Disc
To Copy a DVD to a blank DVD Disc you need a DVD copy Software and a DVD +/- RW Drive and a blank DVD Disc.
Step 1. Choose Source:
The source of this DVD Copy software can be: DVD disc, ISO image file and DVD folder
Step 2. Preparation
Before you click the “Start” button,
1. You can choose to copy the full disc or the main movie.
2. You can choose the audio, subtitle of the copy.
3. You can change the name of the volume.
4. You can choose to “include menu” or “skip menu” or neither of them.
Step 3. Choose Target:
You can copy your source to 3 target: DVD disc, ISO image and DVD folder
Step 4: Start Copy
Part 3: How to Convert Video
Here you need a Video Converter to help you.
Step 1: Add Video
Step 2: Choose output profile
Step 3: Start Conversion
2010年12月24日星期五
How to Copy DVD, Rip DVD, Convert Video on Mac
Many friends want to share their home-make DVDs and their DVD movies with others and also they always feel difficult to do that. Today I will share you a really easy way to Copy DVD to another DVD disc, DVD image ISO, or a DVD folder. Also I will also introduce you how to rip DVD and convert videos on Mac.
Part 1: How to copy a DVD to another DVD disc/DVD image ISO/DVD folder on Mac
Step 1: DVD Copy for Mac.
To copy a DVD on Mac, you need a DVD Copy for Mac to help you. Aiseesoft DVD Copy for Mac is a good choice.
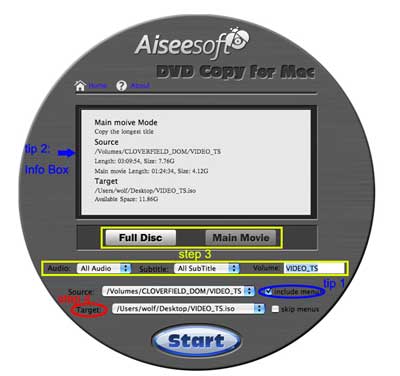
Step 2: Load Your Source
This excellent DVD copy for Mac allows you to load DVD folder and DVD image ISO.
Step 3: Choose Output Info
1. "Full Disc" or “Main Movie”
This DVD copy for Mac enables you to copy the full disc and also the main movie according to your need.
2. "Audio", "Subtitle" and "Volume" name
You can choose your output audio from the "Audio" drop-down list, such as "all audio"/ "None"/ or some audio the DVD provide.
Subtitle is always an important thing, you can choose your output subtitle in "Subtitle" drop-down list.
You can also name your output volume's name
Step 4: Choose Your Target
You can copy your DVD to another DVD disc, DVD folder or DVD image ISO.
Tips:
1. You can also choose to copy the menus or not.
2. All the info you choose will be displayed on the "Info Box".
Part 2: How to rip DVD to video formats on Mac
Step 1: Download Aiseesoft DVD Ripper for Mac.
Step 2. Load DVD
Insert DVD into your DVD-ROM, run DVD Ripper for Mac, click "Load DVD", find the DVD folder of the movie you want to add from your DVD-ROM, and Click "Open".
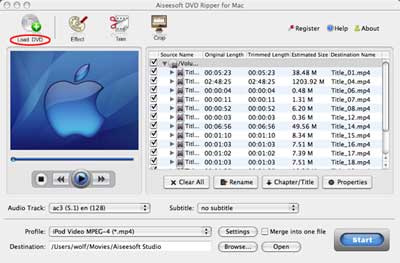
Step 3. Set output format.
This best DVD ripper for Mac provides you output formats as many as you want. Just choose one from the drop down list "profile" according to your portable player.
Step 4: Conversion
You can just Click "Start" to begin your conversion.
Part 3: How to Convert Video files on Mac
Step 1: Download Aiseesoft Video Converter for Mac
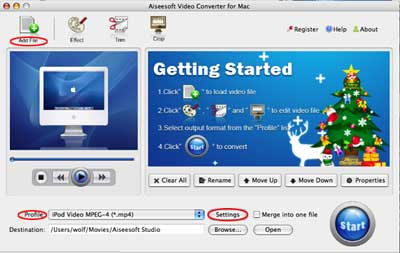
Step 2: Load video
Easily click "Add File" to load your video that you want to convert.
Step 3: Choose output profile and settings
At the bottom of the interface there are a drop-download list named "profile". You can choose your output format here.
Tips:
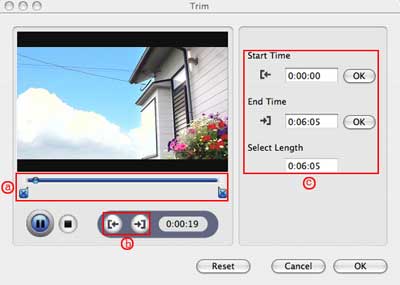
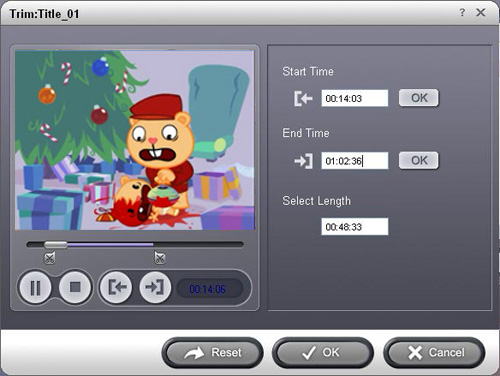
1. Trim
If you want to pick up a part of the video to convert, please click "Trim" button and drag the "Start trim slider" to set the start time and "End trim slider" to set the end time. (a) You can also do that by clicking the "Start trim button" and "End trim button" (b). The third way you do that is set the exact Start/End time at the right of the pop-up window and click "OK".(c)
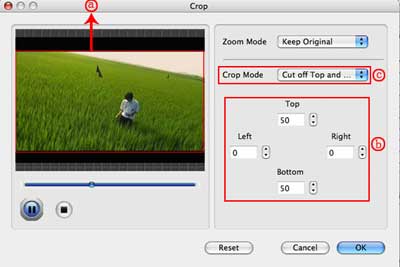
2. Crop
If you want to remove the black edges or you want to convert a certain area of your video, please click the "Crop" button. You can do this either by drag the frame around the movie (a) or set the crop value: "Top, Left, Bottom, Right".(b). Another way to do that is choose models from "Crop Mode"(c).
Aiseesoft Video Converter for Mac also allows you to chose the output aspect ratio above the crop pane, "Keep Original, full screen, 16:9 and 4:3" are available.
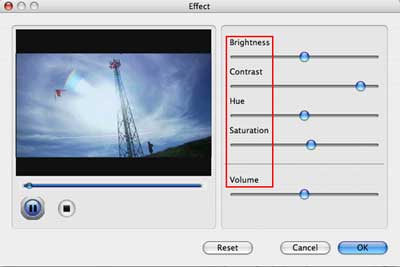
3. Effect
If you want to adjust the effect of your movie, please click the "Effect" button and a pop-up effect window will appear. It allows you to edit your movie’s effect including "Brightness, Contrast, Hue, Saturation and Volume".
2010年12月7日星期二
How to use DVD decypher to rip DVD to iPod, PSP, PowerPoint etc on PC
1. Use DVD decypher to rip DVD to VOB files.
DVD Decrypter is a free DVD ripper that can create backup disc images of the DVD-Video structure of DVDs. It can be used to image any DVD, but controversially it is especially useful for decrypting copy-protected movies. The program can also burn images to disc. CSS decrypting software (such as DVD Decrypter, AnyDVD, Smartripper, and DVD Shrink) allows a region-specific DVD to be copied as an all-region DVD. It also removes Macrovision, Content Scrambling System (CSS), region codes, and user operation prohibition.
Step 1. Install DVD decypher
Download it from: http://www.dvddecrypter.org.uk/. To install DVD decypher, simply mount the .exe archive by double-clicking it, and setp by step to click "next".
Step 2. Rip DVD using DVD decypher
After you insert a movie DVD into your DVD burner or player, launch DVD Decrypter. In the window to the right you will see all the files on that DVD.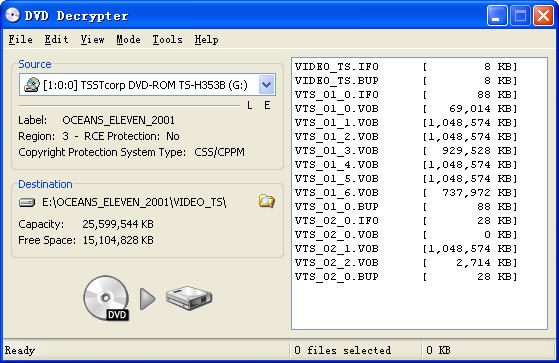
NOTE: If the files are not shown in the right window pane, on the Task Bar, click on Mode and click on FILE F to place a checkmark beside it as shown in the picture above.
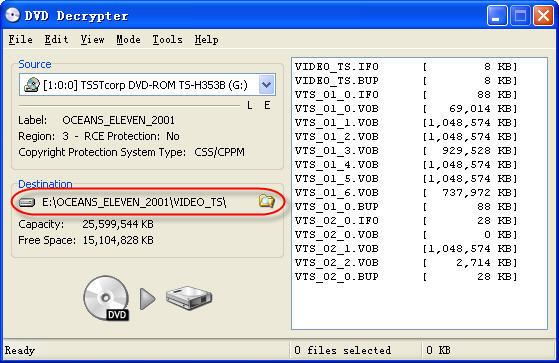
You can choose the output folder by:
Under "Destination", click on the Folder out to the right of the movie path, locate the folder you want to rip the DVD to, then double left click on folder to open it then click OK.
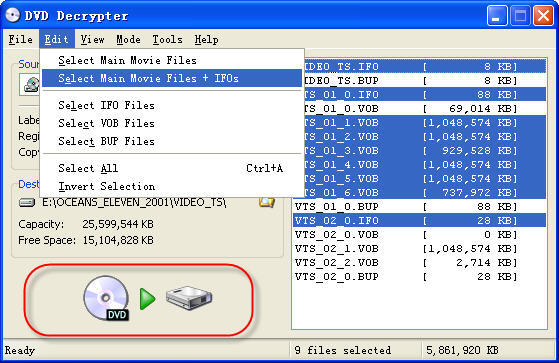
You can select to rip the whole DVD or choose to rip a segment of the DVD.
Explanation:
.IFO = The IFO files includes information such as chapters, subtitle tracks and audio tracks.
.VOB = The VOB files contains the actual video, audio, subtitles and menus.
.BUP = Backup files of the IFO files.
Step 3. Finish conversion
Click on the Hard Drive Symbol to the right of the green arrow. After clicking on the Hard Drive Symbol, you will have the screen which shows the decryption in progress.
After conversion by this free DVD ripper, you can find the VOB files in the "Destination".
2. Convert the .VOB files to video formats compatible with iPod, iPhone, PSP, PowerPoint, etc.
Now you need to use Aiseesoft Total Video Converter to convert .VOB files to formats compatible with popular players such as iPod, iPhone, Apple TV, PSP, etc. You can also upload the converted files form DVD (.VOB) to YouTube, Myspace, and other video sharing site. YouTube accepts a wide range of video file formats such as .WMV, .AVI, .MOV, and .MPG, etc. PowerPoint understands mpeg, asf, avi, wpl. wm, wmx, wmd, wmz, dvr-ms, mpv2, mp2v, mov, etc. If you want to put the VOB files on PowerPoint, you can choose .avi as output format.
Step 1. Download and install Aiseesoft Total Video Converter.
Step 2. Run Aiseesoft Total Video Converter, click "Load DVD" button to import the .VOB files, choose the output format, then click "Start" to start the conversion, the default setting works perfectly.
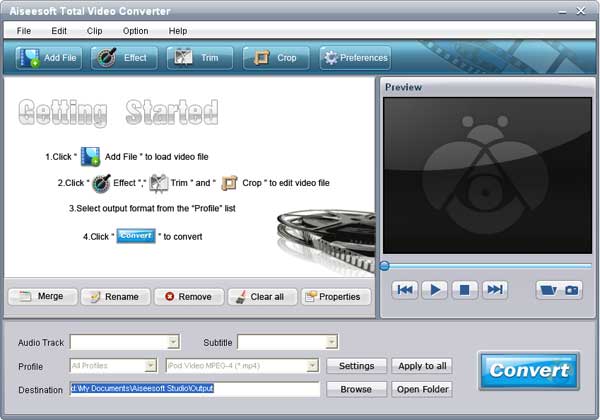
Step 3. After conversion finished, you can use transfer the converted files to the players.
For example :
use iTunes to transfer the mp4 video to your iPod, here are the steps:
1). Open iTunes and click "File" to add your converted videos to iTunes library.
2). plug in your iPod to computer, then iTunes will detect your iPod as a device.
3). Select your iPod device on the left panel of iTunes, click "Movies" tab, check the videos you want to sync and click "Apply", done.
Use Zune software to transfer wmv video to Zune player, here are the steps:
1). Install Zune software, you can download it from here for free: http://www.zune.net
2). Plug in your Zune player to computer
3). Drag the wmv video to Zune library
4). Click "start sync" to sync your Zune. OK.
Tips: Aiseesoft DVD Ripper can rip DVD to all popular video and audio formats directly. It can rip DVD to videos including MP4, AVI, M4V, 3GP, MPG, MPEG, FLV, etc; and it can convert DVD audio to MP3, M4A, AAC, AC3, etc. And it is more easy to use than Mac the ripper. You can have a try.
DVD Decrypter is a free DVD ripper that can create backup disc images of the DVD-Video structure of DVDs. It can be used to image any DVD, but controversially it is especially useful for decrypting copy-protected movies. The program can also burn images to disc. CSS decrypting software (such as DVD Decrypter, AnyDVD, Smartripper, and DVD Shrink) allows a region-specific DVD to be copied as an all-region DVD. It also removes Macrovision, Content Scrambling System (CSS), region codes, and user operation prohibition.
Step 1. Install DVD decypher
Download it from: http://www.dvddecrypter.org.uk/. To install DVD decypher, simply mount the .exe archive by double-clicking it, and setp by step to click "next".
Step 2. Rip DVD using DVD decypher
After you insert a movie DVD into your DVD burner or player, launch DVD Decrypter. In the window to the right you will see all the files on that DVD.
NOTE: If the files are not shown in the right window pane, on the Task Bar, click on Mode and click on FILE F to place a checkmark beside it as shown in the picture above.
You can choose the output folder by:
Under "Destination", click on the Folder out to the right of the movie path, locate the folder you want to rip the DVD to, then double left click on folder to open it then click OK.
You can select to rip the whole DVD or choose to rip a segment of the DVD.
Explanation:
.IFO = The IFO files includes information such as chapters, subtitle tracks and audio tracks.
.VOB = The VOB files contains the actual video, audio, subtitles and menus.
.BUP = Backup files of the IFO files.
Step 3. Finish conversion
Click on the Hard Drive Symbol to the right of the green arrow. After clicking on the Hard Drive Symbol, you will have the screen which shows the decryption in progress.
After conversion by this free DVD ripper, you can find the VOB files in the "Destination".
2. Convert the .VOB files to video formats compatible with iPod, iPhone, PSP, PowerPoint, etc.
Now you need to use Aiseesoft Total Video Converter to convert .VOB files to formats compatible with popular players such as iPod, iPhone, Apple TV, PSP, etc. You can also upload the converted files form DVD (.VOB) to YouTube, Myspace, and other video sharing site. YouTube accepts a wide range of video file formats such as .WMV, .AVI, .MOV, and .MPG, etc. PowerPoint understands mpeg, asf, avi, wpl. wm, wmx, wmd, wmz, dvr-ms, mpv2, mp2v, mov, etc. If you want to put the VOB files on PowerPoint, you can choose .avi as output format.
Step 1. Download and install Aiseesoft Total Video Converter.
Step 2. Run Aiseesoft Total Video Converter, click "Load DVD" button to import the .VOB files, choose the output format, then click "Start" to start the conversion, the default setting works perfectly.
Step 3. After conversion finished, you can use transfer the converted files to the players.
For example :
use iTunes to transfer the mp4 video to your iPod, here are the steps:
1). Open iTunes and click "File" to add your converted videos to iTunes library.
2). plug in your iPod to computer, then iTunes will detect your iPod as a device.
3). Select your iPod device on the left panel of iTunes, click "Movies" tab, check the videos you want to sync and click "Apply", done.
Use Zune software to transfer wmv video to Zune player, here are the steps:
1). Install Zune software, you can download it from here for free: http://www.zune.net
2). Plug in your Zune player to computer
3). Drag the wmv video to Zune library
4). Click "start sync" to sync your Zune. OK.
Tips: Aiseesoft DVD Ripper can rip DVD to all popular video and audio formats directly. It can rip DVD to videos including MP4, AVI, M4V, 3GP, MPG, MPEG, FLV, etc; and it can convert DVD audio to MP3, M4A, AAC, AC3, etc. And it is more easy to use than Mac the ripper. You can have a try.
2010年11月11日星期四
How to put DVD movie into Windows Movie Maker and iMovie
If you want to edit a DVD movie with Windows Movie Maker or import several DVD clips into Mac iMovie to build a new DVD, but you get frustrated with the DVD format, this guide may help you solve the problem.
Before you get started, it will be helpful if you learn something about the DVD, WMM and iMovie.
General DVDs have CSS copy protection in MPEG-2 or VOB format.
(Windows) Windows Movie Maker supports WMV, AVI and MPG video files.
(Mac) iMovie accepts MOV and MPEG4 video files.
This guide includes two parts:
1. How to put DVD movie into Windows Movie Maker.
2. How to add DVD clips to Apple Mac iMovie .
Part1. How to put DVD movie into Windows Movie Maker
Step1. To put a DVD movie into Windows Movie Maker, you have to rip your DVD to WMV or AVI video first, and then you can load it into Windows Movie Maker. I’d prefer using Aiseesoft DVD Ripper to do this. You can get this program at: http://www.aiseesoft.com/dvd-ripper.html Then install and run it, put your DVD disc into your DVD drive, click “Load DVD” to locate your DVD file and import it, or load it by clicking “Load IFO File” to add DVD IFO file. (This DVD Ripper can rip copyright protected DVD movies, but you should remember that it’s illegal rip DVD for any business purposes)
Step2. Select output format and subtitle
After you load the DVD files, click the format drop-down list to select “WMV – Windows Media Video (*.wmv)” or “AVI – Audio Video Interleaved (*.avi)” as the output format. A regular DVD movie has multiple subtitles and audio tracks, and you can select the right one for you. If you just want a certain part of the DVD movie, you can click “trim” to cut the DVD movie. Just drag the timeline bar to set the start and end time, and then blue line will be the captured parts.
For advanced user, if you want to output higher quality video, click the “Settings” button to open the panel, here you can customize video bitrate, audio bitrate, resolution, framerate, etc. Higher bitrate will result in bigger file size.
Step 3. Start to convert
After the above steps, you just need to click “Start” and wait for the conversion to be finished. It provides the fastest conversion speed (>300%), completely support dual core CPU.
Step 4. Edit DVD with Windows Movie Maker (optional)
Run Windows Movie Maker, in the “Movie Task” bar, click “Add Video” to browse your computer and located the converted files, and then you can start to make personal movies.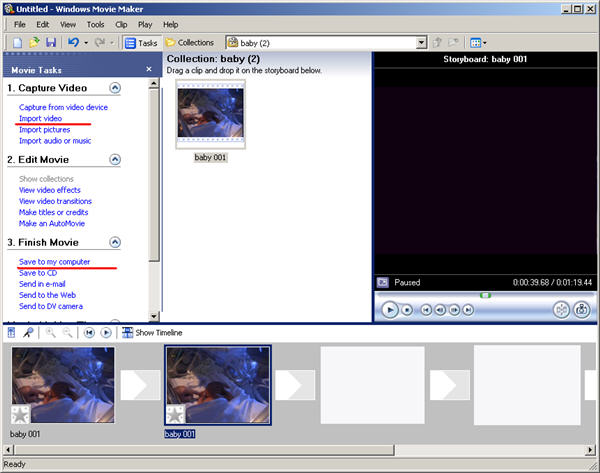
Tips:Many users may wonder how they can convert Windows Movie Maker file (*.MSWMM) to other video format. Actually, A *.MSWMM file is not a video file. It is a project file of Movie Maker (more like a record file). You have to open this file in Windows Movie Maker and save the movie to your computer: Go to Movie Tasks bar > Finish Movie > Save to my computer. After that you will have a WMV file which can be converted to another video format or burned to DVD.
Part2. How to add DVD clips into Apple iMovie.
iMovie is similar to Windows Movie Maker, it supports MOV and MP4 video, so you just need to convert your DVD movie to the right format. Aiseesoft DVD Ripper has a Mac Version which supports both Mac OS Tiger and Leopard; you can download it for free from here: http://www.aiseesoft.com/dvd-ripper-for-mac.html
It is easy to use for the operation steps being similar to the windows version.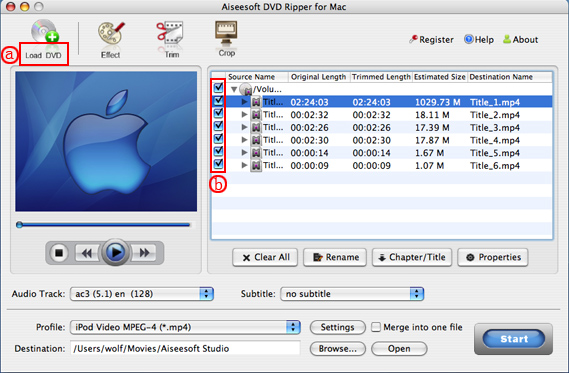
When the conversion is finished, you can run the iMovie, build a new project, and then drag the converted files to the work space to make personal files.
When the task is finished, In the Menu bar, Click "File" -> "Export" and save it as QuickTime video.
Download Aiseesoft DVD Ripper for Windows (put DVD into Windows Movie Maker)
Download Aiseesoft DVD Ripper for Mac (put DVD into Apple iMovie)
2010年11月2日星期二
Some problems the new iPod touch users may meet
1. How to change iTunes to recognize the new iPod touch
Some New iPod users may meet the situation that your iTunes can not detect your new iPod nano, iPod touch, or iPod Classic. It should recognize it immediately. If it doesn't, download the latest version of iTunes. The problem will be solved:
1) Re-launch iTunes, with and without your iPod plugged in.
2) With iTunes open, reset your iPod Touch
(here:http://docs.info.apple.com/article.html?artnum=305743 ) Press and hold the Sleep/Wake button and the Home button at the same time for at least ten seconds until the Apple logo appears.
3) Restart your computer leaving your iPod touch plugged in
Note: If you uninstall iTunes from a computer, it will be uninstalled for all the users. But it will show up again for all users once you re-install it again. Before uninstalling each user should backup his/her playlists so they can bring them back when the re-install is completed.No music for any of the users will be removed by iTunes. It will remain intact where it is saved.
2.'I can't turn on my iPod'
I have a 1st or 2nd generation video iPod (80 gig).
My computer is windows 2000 so I downloaded the windows 2000 iTunes. So I decided to update my iPod, it was updated and it was fine. It ran out of power. Then it won't turn on? I tried to charge it but it just keeps saying please wait such and such. I left it there for like 2 hours already, and still it didn't charge up... Is the problem because I updated my iPod or something else? And when I opened my computer, iTunes asked me if I can format my iPod into windows. I put yes, it didnt do anything.So I have to problems, its not charging.. and its not turning on.
by Ashley :'My friend had this same problem a few years ago.She just left it plugged in to her computer for a few days, waited it out... eventually the problem fixed itself on its own. I'd say just wait it out for a day or two, and if it's still having problems, take it in to your nearest Circuit City or something.”
by Karat :'its the most popular iPod problem. If you drain the battery fully, you're screwed. Basically the battery is down, but the darn thing wont charge unless you connect it to the usb and the usb wont detect it unless it has charge! So please take it to your nearest apple outlet.”
by Kylla :'The one thing you never want to do with an iPod is let it run out of power, not good for it at all :P I've done it a few times but try to avoid it. What you want to do is hold the menu button and the play/pause button at the SAME time and just wait for it. It should restart it. Thats how my iPod works, yours could be different so experiment with the buttons. Try holding perhaps the center button and the play/pause button? or center button and the menu button? Try to see which two buttons will restart it, its bound to work. But hold BOTH of them down at the SAME time with one hand..and be patient, wait for about 10-15 seconds or so. :)”
3. Why does my 30G iPod video always die quickly?
Even when I am just listening to music. It shuts off after about 45 min. And that is a problem because I am going on a plane trip soon and I plan to watch a movie on my iPod, but movies eat your batttery. Does this happen to anyone else???? How can I make the battery life last longer. btw, it is only like a year old.
by dipin :'In an iPod the battery life is different.
it doesnt depend on how old it is rather it depends on how many times you have charged and discharged it.
for increasing the battery life you should fully charge the battery every time you are charging it . and secondly you should never let it discharge completely . put it on charging just before it shows the red signal and disconnect it only when it is fully charged.
sorry to say but now u'll have to get the battery replaced from apple reseller if you want to watch complete movie the battery life as said by apple is 500 complete cycles of charging and discharging”
by sugadoll :'The same thing happened to me. The problem is that your computer can't detect a completly dead iPod, but you need the computer to charge it so your screwed. j/k I solved it by pluging it into my ihome dock that plugs into the wall. So if you have a wall iPod dock or a car one you can charge it enough so that the computer can detect it. Problem solved.
Recommended Products For you:
DVD Ripper for Mac
Convert DVD to any video or audio formats on Mac OS X. Aiseesoft DVD Ripper for Mac is a professional Mac DVD ripper software.
Video Converter for Mac
Convert all video formats from one to another on Mac OS X. Aiseesoft Video Converter for Mac is a specially designed Mac video converter.
2010年10月16日星期六
How to upload videos to YouTube easily and quickly on Mac
Google has released basic software called Vidnik which is the quickest, simplest way to make movies using the built - in camera on your Macintosh and upload those movies to your YouTube account. You must first sign up for a free YouTube membership to upload videos. You can use Vidnik to create a video diary, or just to quickly record a video comment to attach to an existing YouTube video. Vidnik works with the built-in video cameras on recent Macs, with Firewire video cameras, and with many USB video cameras.
Part 1, use Vidnik to Record video segments using your iSight camera and upload them to YouTube.
To use Vidnik, run the app, then click the record button to start recording. Click it again to stop. Trim to just the golden moments you want to keep, as in the screen shot above. Fill in the required title, description, and so on. Click the upload button. That's it.
Part 2, Use Vidnik to upload videos to youtube
You can drag movies made in other programs onto Vidnik's column of movies, and then click the upload button. And to use another program to do a little post-production, use the Gear menu to show Vidnik's movie file in the Finder. Edit the movie in the other program, and then upload it.Vidnik can only support videos such as: 3GP, AVI, DAT, MOV, MP4, M4A, WAV, AAC. It does not support ASF, FLV, MPEG, RM, WMV, MP3, AC3.
You can use the video converter for Mac to convert your videos to the formats that Vidnik can run.
If you want to upload DVD to TouTube, you need to use DVD ripper to rip DVD to video formats supported by YouTube first. If you are Mac user, you can use this DVD ripper for Mac .
2010年9月13日星期一
iPAQ converter - convert mpeg mp4 wmv avi to ipaq, rip dvd to ipaq
The tutorial includes two parts. The part 1 will show you how to convert mpeg mp4 wmv flv 3gp avi to iPAQ video step by step with Aiseesoft Total Video Converter. And the part 2 will show you how to convert dvd movie to iPAQ video step by step with Aiseesoft DVD Ripper. The detailed steps are as follows:
Part1. how to convert mpeg mp4 wmv flv 3gp avi to iPAQ video?
Aiseesoft Total Video Converter is a powerful iPAQ video converter which can convert various video formats including AVI, Divx, XviD, WMV, MPEG, MPG, FLV(YouTube video), RM, RMVB, TOD, MOD, ASF, H.264, etc to iPAQ video. And it is a video joiner, and video editor for you to convert video files to the formats you want, so you can enjoy you movie on all common digital players like iPod, Zune, iPhone, Apple TV, PSP, Xbox 360, PS3, Archos, iRiver, Creative Zen, PMP, Smart Phone, Pocket PC, PDA, Mobile Phone, etc.
Here's the tutorial about how to convert mpeg mp4 wmv flv 3gp avi to iPAQ video with Aiseesoft Total Video Converter
Step1 Free to Download Aiseesoft Total Video Converter and install it.
Step2 Click the "Add File" button to import your videos. If you experience any problems adding videos by directly clicking the "Add File" button, you can click "File -> Add File" to add the video files you want to convert from your computer.
Step3 This software can convert video to various video formats for PMP, Xbox 360, iPod, PSP, Zune, cell phone, etc. Click the "Profile" drop-down list to select the format "HP iPAQ Video(*.wmv)"
Step4 If you want to customize the output quality, click the "Settings" button to open the Settings panel, where you can set resolution, frame rate, video bit rate, audio bit rate, sample, etc.
Step5 Click the "Browse" button to specify a location on your computer to save the converted movie. If you want to open the output folder, you can just click the button "Open Folder". If you want to merge the added video files into one file, check the option "Merge into one file". By default, the the merged file is named after the first selected file.
Step6 When you get ready to convert the added video files, click the “Start” button to start conversion.
Part 2. how to convert dvd movie to iPAQ video?
Aiseesoft DVD Ripper is all-in-one, super fast DVD ripper software. The best DVD ripper can rip DVD movies to all popular video and audio formats. And it let you easily copy DVD movie to iPAQ video, iPod Video, Zune, iPhone, Apple TV, PSP, Xbox 360, PS3, Archos, iRiver, Creative Zen, PMP, MP4/MP3 Player, Smart Phone, Pocket PC, PDA, Mobile Phone, etc.
Step1. Download Aiseesoft DVD Ripper and install it.
Step2. Insert your DVD disc into your DVD-Rom, then run the software, click "Load DVD" button and add the DVD file. You can also add DVD/IFO from your hard disk by clicking "Load IFO File".
Step3. This software can convert DVD to various video formats such as MPEG-4, AVI, WMV, FLV, 3GP, VOB, etc. Click the "Profile" drop-down list to select the format "HP iPAQ Video(*.wmv)".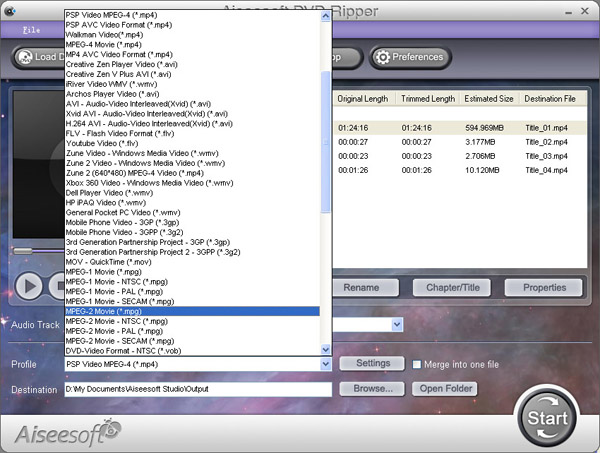
If you want to customize the output video, you can click the "Settings" button next to the format field to open the Settings window and set video resolution, frame rate, bit rate, encoder, etc. See the figure below: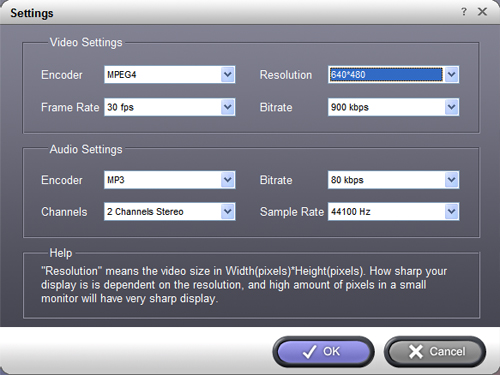
Step4. Select Subtitle and Audio
Regular DVD movies usually have several subtitles such as English, French, German, etc. You can select one you prefer. You can also delete the subtitle by selecting "No Subtitle", Selecting Audio is the same.
Step5. After the above steps, click "Start" to start conversion.
How to use Mac The Ripper to rip DVD to iPod, iPhone, etc. on Mac
Part 1. Use MacTheRipper to minus the copy protections for free
Mac The Ripper is a free DVD ripper (extractor) for Mac OS X. It can extract commercial DVD movies to your hard drive, minus all the copy protections and region controls put in place by DVD publishers. Mac The Ripper removes CSS encryption, Macrovision protection, and sets the disc's region code to '0' for region-free by default, and is capable of removing RCE region protection as well, making an unrestricted copy of any DVD movie you own. It doesn't rely on the DVD drive to get the CSS decryption keys, so that means that you do not need to play the DVD with DVD Player in order to rip it to your hard drive unprotected. MacThe Ripper is also capable of removing UOPs, or User Operation Prohibitions, which are the settings that prevent you from skipping or fast-forwarding certain parts of DVDs, such as FBI warnings, previews, logos, intros, etc. Mac The Ripper is also able to extract discs with the new ARccOS protection, as well as DVDs that have been damaged or improperly mastered.
WARNING: Disabling UOPs can break the navigation on certain DVDs. If you disable UOPs, be sure to verify the DVD with DVD Player before you burn it to DVD±R disc.
Step 1. install MacThe Ripper
Download it from: http://www.Mactheripper.org. To install Mac The Ripper, simply mount the .dmg archive by double-clicking it, and copy the Mac The Ripper application from it to your Applications folder (or wherever you want it ), along with this Mac The Ripper Manual if you need it.
Step 2. convert DVD for free
To use Mac The Ripper, you should insert your DVD movie into your DVD drive and launch the Mac The Ripper application. Then, you should set the RCE options if applicable. If Mac The Ripper displays 'DISC RCE: -CLEAR-' after scanning the DVD in the drive, you can leave the 'RCE Region' popup menu on 'OFF', as it is by default. Only (and always) set the 'RCE Region' to 'OFF' when it says that RCE is '-CLEAR-'.
Once you've selected the type of extraction and options you want, you can go back to the 'Disc' tab and click the 'GO!' button (or hit the 'Enter' or 'Return' key) to start the extraction.
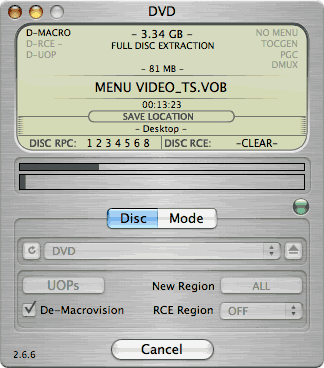
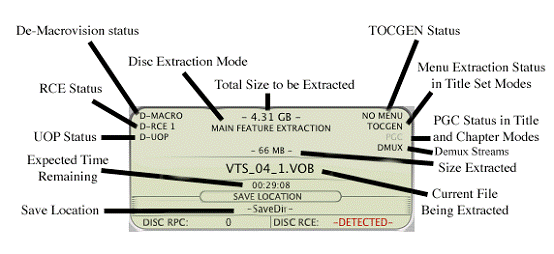
Step 3, finish extract movie from DVD.
You can find a folder in the save location. The output files extracted by MacTheRipper are saved as .VOB format .
Tip: RCE region protection
region 1: North America; U.S. territories; Bermuda
region 2: Europe; Western Asia; Kingdom of the Netherlands; Egypt, Japan, Lesotho, South Africa, Swaziland; British overseas territories, French overseas territories; Greenland.
region 3: East and Southeast Asia
region 4: Oceania; Central and South America; Caribbean; Mexico
region 5: Africa, Central and South Asia, Belarus, India, Mongolia, North Korea, Russia, Ukraine
region 6: Mainland China
Part 2. Convert the .VOB files to other video, audio formats compatible with iPod, PSP
After using Mac The Ripper to minus the copy protections, we can use Aiseesoft Video Converter for Mac to convert .VOB files to formats that compatible with popular players such as iPod, iPhone(iPhone 3G), Apple TV, PSP, Zune, etc.
Step 1:
Download and install Aiseesoft Video Converter for Mac
Note: If you just want to convert .vob file for iPod, You can choose this powerful iPod video converter for Mac. It can convert .VOB file to iPod video and iPod audio on Mac OS with powerful functions and fast converting speed!
Step 2:
Run Aiseesoft Video Converter for Mac, click 'Add File' button to import the .VOB files, choose the output format, then click 'Start' to start the conversion. If you want to put the video on PowerPoint, you can choose .avi as output format.
Tip: Aiseesoft DVD Ripper for Mac can rip DVD to all popular video and audio formats directly. It can rip DVD to videos including MP4, AVI, MOV, M4V, 3GP, MPG, MPEG, FLV, etc and can convert DVD audio to MP3, M4A, AAC, AC3, etc. It is more easy to use than Mac the ripper. You can download it for free and have a try.
Step 3:
After the conversion is finished, You can transfer the converted files to the players. For example, use iTunes to transfer the mp4 video to your iPod, here are the steps:
1. Open iTunes and click "File" to add your converted videos to iTunes library.
2. Plug in your iPod to computer, then iTunes will detect your iPod as a device.
3. Select your iPod device on the left panel of iTunes, click "Movies" tab, check the videos you want to sync and click "Apply", done.
Recommend: DVD Converter Suite for Mac: all-in-one solution to convert DVD and Video to MP4, AVI, FLV, MOV, MKV, ASF, directly for your iPhone, iPod, PSP, iPod touch, Zune, etc. on Mac OS X.
Mac The Ripper is a free DVD ripper (extractor) for Mac OS X. It can extract commercial DVD movies to your hard drive, minus all the copy protections and region controls put in place by DVD publishers. Mac The Ripper removes CSS encryption, Macrovision protection, and sets the disc's region code to '0' for region-free by default, and is capable of removing RCE region protection as well, making an unrestricted copy of any DVD movie you own. It doesn't rely on the DVD drive to get the CSS decryption keys, so that means that you do not need to play the DVD with DVD Player in order to rip it to your hard drive unprotected. MacThe Ripper is also capable of removing UOPs, or User Operation Prohibitions, which are the settings that prevent you from skipping or fast-forwarding certain parts of DVDs, such as FBI warnings, previews, logos, intros, etc. Mac The Ripper is also able to extract discs with the new ARccOS protection, as well as DVDs that have been damaged or improperly mastered.
WARNING: Disabling UOPs can break the navigation on certain DVDs. If you disable UOPs, be sure to verify the DVD with DVD Player before you burn it to DVD±R disc.
Step 1. install MacThe Ripper
Download it from: http://www.Mactheripper.org. To install Mac The Ripper, simply mount the .dmg archive by double-clicking it, and copy the Mac The Ripper application from it to your Applications folder (or wherever you want it ), along with this Mac The Ripper Manual if you need it.
Step 2. convert DVD for free
To use Mac The Ripper, you should insert your DVD movie into your DVD drive and launch the Mac The Ripper application. Then, you should set the RCE options if applicable. If Mac The Ripper displays 'DISC RCE: -CLEAR-' after scanning the DVD in the drive, you can leave the 'RCE Region' popup menu on 'OFF', as it is by default. Only (and always) set the 'RCE Region' to 'OFF' when it says that RCE is '-CLEAR-'.
Once you've selected the type of extraction and options you want, you can go back to the 'Disc' tab and click the 'GO!' button (or hit the 'Enter' or 'Return' key) to start the extraction.
Step 3, finish extract movie from DVD.
You can find a folder in the save location. The output files extracted by MacTheRipper are saved as .VOB format .
Tip: RCE region protection
region 1: North America; U.S. territories; Bermuda
region 2: Europe; Western Asia; Kingdom of the Netherlands; Egypt, Japan, Lesotho, South Africa, Swaziland; British overseas territories, French overseas territories; Greenland.
region 3: East and Southeast Asia
region 4: Oceania; Central and South America; Caribbean; Mexico
region 5: Africa, Central and South Asia, Belarus, India, Mongolia, North Korea, Russia, Ukraine
region 6: Mainland China
Part 2. Convert the .VOB files to other video, audio formats compatible with iPod, PSP
After using Mac The Ripper to minus the copy protections, we can use Aiseesoft Video Converter for Mac to convert .VOB files to formats that compatible with popular players such as iPod, iPhone(iPhone 3G), Apple TV, PSP, Zune, etc.
Step 1:
Download and install Aiseesoft Video Converter for Mac
Note: If you just want to convert .vob file for iPod, You can choose this powerful iPod video converter for Mac. It can convert .VOB file to iPod video and iPod audio on Mac OS with powerful functions and fast converting speed!
Step 2:
Run Aiseesoft Video Converter for Mac, click 'Add File' button to import the .VOB files, choose the output format, then click 'Start' to start the conversion. If you want to put the video on PowerPoint, you can choose .avi as output format.
Tip: Aiseesoft DVD Ripper for Mac can rip DVD to all popular video and audio formats directly. It can rip DVD to videos including MP4, AVI, MOV, M4V, 3GP, MPG, MPEG, FLV, etc and can convert DVD audio to MP3, M4A, AAC, AC3, etc. It is more easy to use than Mac the ripper. You can download it for free and have a try.
Step 3:
After the conversion is finished, You can transfer the converted files to the players. For example, use iTunes to transfer the mp4 video to your iPod, here are the steps:
1. Open iTunes and click "File" to add your converted videos to iTunes library.
2. Plug in your iPod to computer, then iTunes will detect your iPod as a device.
3. Select your iPod device on the left panel of iTunes, click "Movies" tab, check the videos you want to sync and click "Apply", done.
Recommend: DVD Converter Suite for Mac: all-in-one solution to convert DVD and Video to MP4, AVI, FLV, MOV, MKV, ASF, directly for your iPhone, iPod, PSP, iPod touch, Zune, etc. on Mac OS X.
2010年9月5日星期日
How to play DVD on Mac
This tutorial includes 4 parts:
Part 1, DVD Regions
Part 2, How to play DVD on Mac?
Part 3, How to Unlock DVD Regions on Mac?
Part 4, how to copy protected DVD Movie on Mac OS X
Part 1, DVD Regions
Region 1: North America; U.S. territories; Bermuda
Region 2: Europe; Western Asia; Kingdom of the Netherlands; Egypt, Japan, Lesotho, South Africa, Swaziland; British overseas territories, French overseas territories; Greenland
Region 3: East and Southeast Asia
Region 4: Oceania; Central and South America; Caribbean; Mexico
Region 5: Africa, Central and South Asia, Belarus, India, Mongolia, North Korea, Russia, Ukraine
Region 6: Mainland China
Part 2, How to play DVD on Mac?
VLC is part of a remarkably sophisticated suite of VideoLan applications available for a wide range of operating systems, ranging from Linux to Windows and, of course, Mac OS X.
Download and install VLC and open it, then select File > Open Disc. Click on the Disc tab, click on DVD, select the device, and click OK
Or select File > Open File..., select your VIDEO_TS folder, and voila! You're watching your movie.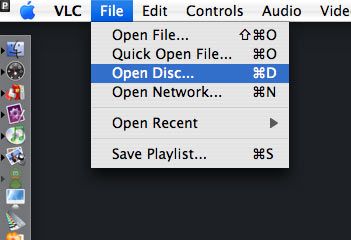
Part 3, How to Unlock DVD Regions on Mac?
Most commercial DVDs use encryption that keeps them locked to one or more “region codes,” meaning the discs you pick up in other continents usually won't play on an American DVD player. If you believe the movie studios, this encryption is a necessary tool in the ongoing war against piracy. Basically, it helps them release the same movie in different parts of the world—at different times and for different prices. However, because pirates rarely resell legitimate copies of movies (they are pirates, after all), this system's primary effect is to prevent movie collectors and frequent travelers from enjoying legally purchased films once they get home.
There are some multi-region DVD players out there. They are perfectly legal, but they tend to be pricey and rare. And if you are the jet-setting type who is likely to pick up foreign flicks in the first place, you probably want to watch them on the go using your laptop. That's why the most frustrating part of region codes is the way they affect laptop DVD players.
Although laptop DVD drives are technologically capable of playing any DVD, they typically force you to switch among region settings to play imported discs. Try switching this setting more than a fixed number of times (typically five over the entire life span of the computer), and the setting will be locked forever.
For example, if you switch from Region 1 (the United States and Canada) to Region 3 (parts of Asia) to watch a kung-fu flick you picked up on a trip to Hong Kong, you'll have to switch back to Region 1 before playing any movies you purchased at your local Best Buy. Watching that one Jet Li movie just burned up two of your five switches—and not even reinstalling your operating system will get you more. Fortunately, some clever programmers have created software solutions that circumvent disc regions entirely, turning your notebook into a portable multiregional DVD player.
There are plenty of programs for Macs that allow you to rip DVD movies on Mac. I recommend Aiseesoft DVD Ripper for Mac which allows you to rip DVD movies on Mac easily. This Mac DVD Ripper is fast in ripping DVD to all popular video and audio formats as it includes the features of DVD Ripper and DVD Audio Ripper. It can rip DVD video to video formats including MP4, AVI, MOV, M4V, 3GP, MPG, MPEG, FLV, etc. and it can convert DVD audio to MP3, M4A, AAC, AC3, etc. It's the best solution to rip a dvd to video or audio formats on Mac. This solution has its advantages (chief among them is that watching movies off your hard drive uses far less battery life than reading them from an optical disc.)
If you do not want to spend money, I recommend downloading VLC, an open-source media player that sometimes circumvents region encoding. The DVD drives on different computers (including various Macs) come from diverse manufacturers, a.nd VLC plays out-of-region discs on some, but not all of them. Unfortunately, there's no way to know if it will work on your system until you try. Fortunately, the program is free.
Part 4, how to copy protected DVD Movie on Mac OS X
Copy protected DVD action can turn into failure if you don't have appropriate software. Very often DVDs are protected against ripping and thus copying the contents of the disc to your hard disk doesn't work. Even if you do succeed in ripping the contents of the disc, to copy protected DVD also means to fit the files on your recordable DVD since the latter can only hold 4.4GB of data while the original DVD is more than 7GB in size.
Copy protected DVD software for those, who have no experience whatsoever with backing-up DVDs, is big deal. DVD Copy for Mac
2010年8月17日星期二
Gphone vs iPhone, which is better
As iPhone is the most talked about smart phone on the planet and it has won millions of hearts of users by his multi-touch screen and other powerful/beautiful design. Of course, iPhone has brought so much money for Apple.
On 23rd, Sep 2008 Google released G1 and claimed that they will have a share of the big market of smart phone.
So, which is better about iPhone and G1? That maybe asked by many people who want to buy a new phone. Here I will give some of opinion about G1 and iPhone.
I will compare these two phones in three aspects, hardware, software, and their performance as a media player.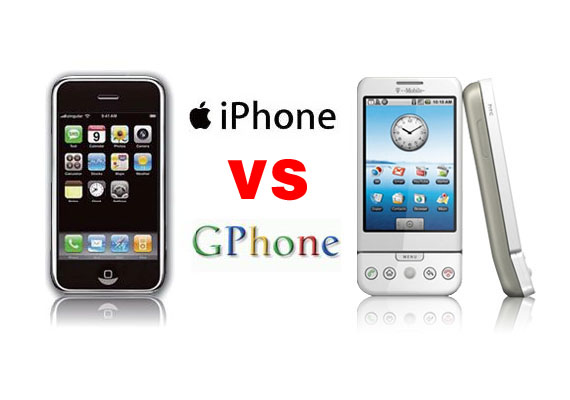
1. The price and storage memory
First, the price and storage memory is what I concern most, for iPhone $199 8GB, $299 16GB, for G1 $179 1GB. When you see this you will say G1 is $20 lower than iPhone but G1 is only 1GB and you will pay another $40 for an 8GB SD Card. So I think iPhone win in this round.
2. Appearance
iPhone is 133 grams/4.7 ounces and G1 is 158 grams/5.57 ounces. G1 is taller while iPhone is thinner (G1: 117.7*55.7*17.1, iPhone: 115.5*62.1*12.3).
3. Mobile Network
For mobile Network, they both have Quad Band GSM/EDGE UMTS, but G1 uses T-Mobile-only US 3G and iPhone uses AT&T-only US 3G.
4. Touch screen and input
About touch screen display, iPhone has Multi-touch 3.5 480*320 163 ppi, but G1 does not support mulit-touch. And in input aspect, G1 uses keyboard, Trackball, 6 buttons and touch screen, while iPhone has home button and multi touch screen.
5. Expansion
In expansion ports, G1 uses SD, ExtUSB(USB+audio) but iPhone has headphone, Dock connector (USB+ audio, video, remote). They have the same wireless WiFi 820.11b/g Limited Bluetooth 2.0 EDR.
6. Others
About hardware, the two phones perform almost the same and the only big difference is the iPhone uses multi-touch screen and G1’s camera is better than iPhone. And iPhone has a 1400Ah battery with 300 hours standby time but G1 only has a 1150Ah battery with 5 hours talk time and 130 standby.
iPhone and G1 are both using Webkit as their browser engine. In media playback aspect, iPhone supports music, audiobook, video, streaming, downloads and rental, while for G1, only music playback. G1 has Android Market as its third party software store while iPhone has iPhone app store. G1’s platform is Modified Java development and iPhone uses Cocoa Touch.
Part 3: Their performance as media player.G1 supports H.264, 3GPP, MPEG4, Codec 3GP video and MP3、AAC、AAC+、WMA、MPEG4、WAV、MIDI、REAL、AUDIO、OGG audio formats.
iPhone supports AAC,Protected AAC,MP3,MP3 VBR,Audible (formats 1, 2, 3), Apple Lossless, AIFF, WAV audio formats and H.264 (up to 1.5Mbps), MPEG-4 (up to 2.5Mbps) 640*480, 30fps, AAC-LC (up to 160 Kbps), 48kHz dimensional sound .m4v, .mp4 and .mov format.
Amazon MP3 Store allows you to download 6 million songs without the DRM protection, 89 cents per song. It is similar with the Apple iPhone, you need to pay for the video and audio sources on the Apple store. But how to get free sources for your G1.
For iPhone and G1 you can buy songs and videos from store, which is really expensive, and you can also make songs and videos for your iPhone and G1 by yourself, you just need to convert your DVDs and videos to mp4 format and then you can put them easily to your iPhone and G1.
Here I recommend you Aiseesoft DVD Converter Suite, it includes Best DVD Ripper, Total Video Converter and iPod to Computer Transfer.
For Mac user, I recommend you Aiseesoft DVD Converter Suite for Mac, it includes DVD Ripper for Mac and Total Video Converter for Mac.
2010年8月11日星期三
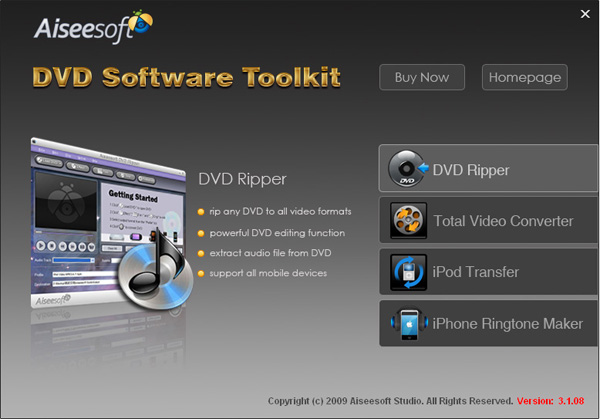
How to rip DVD, convert video, transfer iPod music and make iPhone ringtone for Windows/Mac
This guide aims to show you how to rip a DVD, convert video and transfer music between iPod and computer/two iPod, make your own iPhone ringtone.
Part 1. How to rip DVD to iPod/iPhone/Sansa/PSP/Zune and other MP4 and MP3 Players
Part 2. How to convert all video to MP4, AVI, FLV, 3GP, WMV, MOV, MPG, RM, RMVB, MKV, VOB…
Part 3. How to transfer music from iPod to computer, computer to iPod, iPod to iPod.
Part 4. How to make your own iPhone ringtone for free
Believe or not, to do the things above what you need is download Aiseesoft DVD Software Toolkit and few clicks.
Part 1. How to rip DVD to iPod/iPhone/Sansa/PSP/Zune and other MP4 and MP3 Players.
Step 1. Click “DVD Ripper” on the main interface to run Aiseesoft DVD Ripper
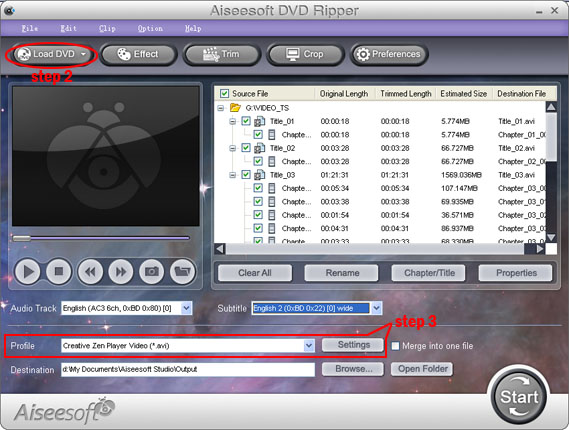
Step 2. Open your DVD Drive and put your DVD in it, then click “Load DVD” and choose “Load DVD” to load your DVD into this best DVD ripper.
Step 3. Choose your output format from the “profile” drop-down list. This best DVD ripper provides you so many formats that out of your expectation, such as “iPod video MPEG 4 (*.mp4)”, “iPhone 3G MOV 640*480 (*.mov)” and so on.
After you choose your output format, you can adjust your output video’s settings, such as “Resolution”, “Frame Rate”, “Bitrate”, “Sample Rate” and so on.
Click “Start” now to begin your conversion and you will get your video soon.
To make your output movie more enjoyable you can do some editings to it through this best DVD ripper. You can choose a part of your movie to convert (trim), remove the black edges of your DVD movie (crop) and also adjust the effect (effect) and select subtitle and audio track.
Part 2. How to convert all video to MP4, AVI, FLV, 3GP, WMV, MOV, MPG, RM, RMVB, MKV, VOB…
Step 1. Click “Total Video Converter” on the main interface to run Aiseesoft Total Video Converter
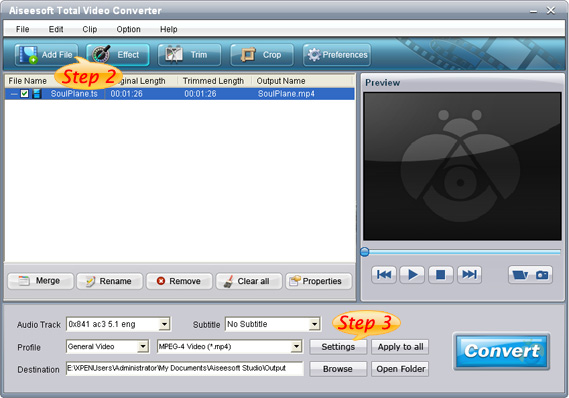
Step 2. Click “Add File” to load the video you want to convert.
Step 3. Choose output format by clicking “profile” and customize your own output video by clicking “settings” to adjust the Resolution, Frame Rate, Bitrate and so on.
Before you click “Start” to begin your conversion, you can do some editing works, such as pick up a part of your video to convert(trim), choose your own play region(crop) and put two or more files into one.(merge into one file).
OK, now you can begin your conversion
Part 3. How to transfer your songs and videos bewteen iPod and computer/iPod
First, Click “iPod Transfer” to run Aiseesoft iPod Transfer
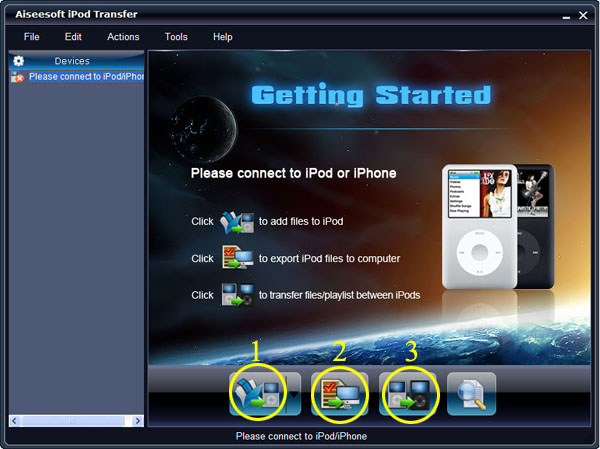
Click “Computer to iPod” button, it will allow you to transfer songs and videos from your computer to iPod easily.
Click “iPod to Computer” button, it will allow you to backup your songs and videos from iPod to your computer.
Click “iPod to iPod” button, it will allow you to transfer songs and videos from one iPod to another iPod dirrectly.
Part 4. How to make your own iPhone ringtone for free
Download Aiseesoft iPhone Ringtone Maker
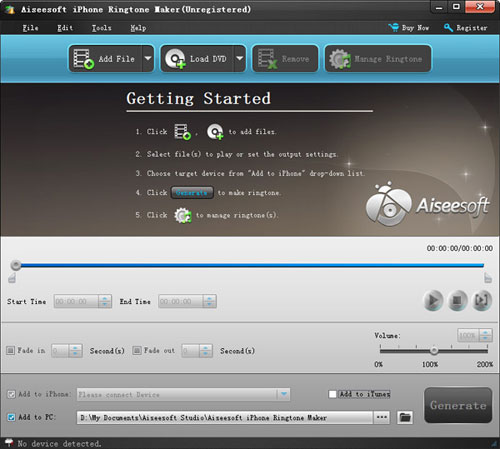
Step 1: Click “Browse” on the right side of "Input File" to import the file that you want to make ringtone from it.
Step 2: Play it and listen the music to find the segment that you want to use it as ringtone. Then drag and click the start & end slider to set your wanted segment, or type the start & end time in the corresponding text box directly to get the exact segment. You also can pre-listen the converted audio before generate.
Step 3: Click “Browse” on the right side of "Local Output Folder" to choose the output destination.
Step 4: Check "Export to iPhone" option, the converted ringtone will be load to your iPhone directly.
Step 5: After all the settings are finished, click “Generate” to begin making your own iPhone ringtone.
If you are a Mac user, I recommend you Aiseesoft DVD Software Toolkit for Mac
it has the same functions as the windows one. You can use it easy rip your DVD, convert your videos, transfer your iPod songs and videos bewteen iPod and your Mac and also make your own ringtone.

订阅:
博文 (Atom)