2010年11月30日星期二

How to Put Photos on a PSP

What you need?
1. A PSP
2. A computer
3. A PSP to computer cord
4. Photos you want on your PSP

Step1, On your computer you will need to find the pictures that you want on your PSP.
Step2, You will need to create a folder on your desktop called PHOTO all in capital letters. Then, drag and drop the picture(s) you want on your PSP into this folder.
Step3, You will need to plug your PSP into the computer using the PSP to computer cord. Then, on your PSP go under the settings menu, and select the option that says USB connection. You should now be in USB mode on your PSP. .Now that your PSP is in USB mode, the computer should recognize it and open an options menu.
Step4, Your computer is displaying an options menu, select the option that says open folder to view files. Now, your computer should be displaying the folders on your PSP.
Step5, Open the folder that says PSP. Now, your computer should be displaying the folders inside of the folder named PSP.
Step6, Drag and drop the folder named PHOTO - the one with your picture(s) -into the folder named PSP, the one you are viewing. You're done; you've found out how to put pictures on your PSP. Now, go show your picture(s) off to friends, family, and whom ever you want.

Recommended Products For you:
DVD to PSP Converter for Windows
Aiseesoft DVD to PSP Converter for Windows is a professional application that is designed to convert DVD movie to PSP on PC.
PSP Movie Converter for Windows
Aiseesoft PSP Movie Converter is a professional video to PSP converter for Windows that can convert all sorts of video formats to PSP video on PC.

2010年11月25日星期四

How to play Videos on Xbox 360

There are two ways you can watch videos on your Xbox 360:

Watch Video on Xbox 360

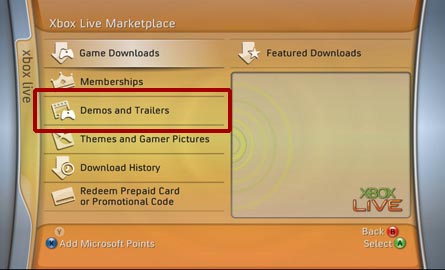
1. Download video from the Xbox Live Marketplace. Some of these videos are available for free while you may have to pay for others. Microsoft is in control of what videos are available through the Xbox Live Marketplace.

Download Xbox 360 video

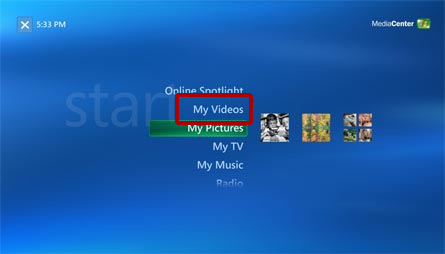
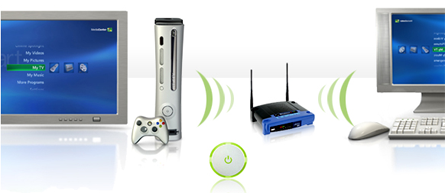
2. Stream videos from your Windows Media Center PC by using your Xbox 360 as a Media Center Extender. You are in control of what videos you want to watch, however there are restrictions on what kind of video you can playback. See below for more details.

Watch Xbox 360 video

Is there any way I can play my own videos WITHOUT a Media Center PC?.
No. Without a Windows XP Media Center PC, you can only play back the movies Microsoft offers in the Xbox Live Marketplace.

Do I need additional hardware/software to playback video on my Xbox 360?
Yes. You will either need the optional Xbox 360 Hard Drive to download/watch video from the Xbox Live Marketplace or you will need a PC with Microsoft Windows XP Media Center as your OS in order to stream video from your PC.

Transfer video to Xbox 360

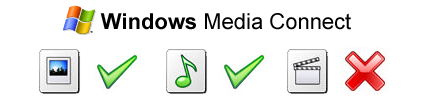
Does it support video streaming through Windows Media Connect?
No. There are video sharing capabilities built into Windows Media Connect, however, Microsoft has chosen to ONLY allow you to share Audio and Pictures through Windows Media Connect. You CANNOT stream videos through Windows Media Connect to your Xbox 360.

stream videos to Xbox 360

What kind of videos can I play using the Media Center Extender?

Microsoft Windows Media Video (WMV) 7, 8, & 9
- Maximum resolution of 1920x1080 (1080p) at 30 frames per second.
- Windows Media Audio Standard or Windows Media Audio Pro audio.
- WMV content may be Windows Media DRM-protected.
- Bitrates up to 8 Mbps.
WMV Image 1 & 2
- Maximum resolution of 800x600
MPEG-1
- MPEG-1 layer I and II audio.
MPEG-2, DVR-MS
- Maximum resolution of 1920x1080 (1080i).
- MPEG-1 layer I and II or AC-3 audio.
- Bitrates up to 19.2 Mbps.

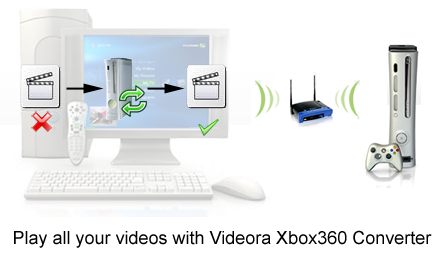
Does it support avi? Divx? Xvid? Quicktime? H264?

No. The Media Center Extender in the Xbox 360 only supports playback of DVR-MS, MPEG-1, MPEG-2 and WMV video.

How can I watch these other (avi, divx, xvid, etc) videos on my Xbox 360?
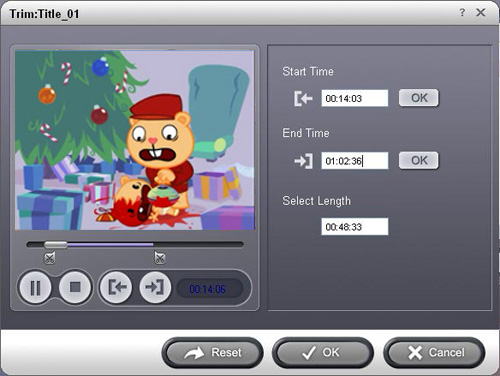
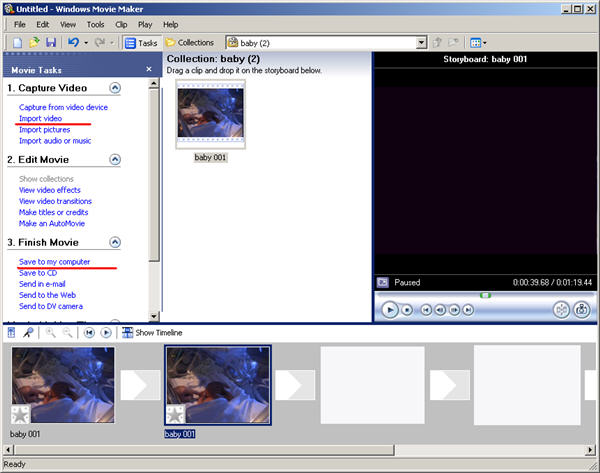
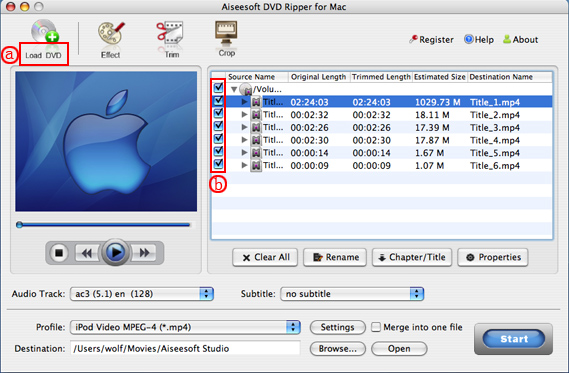
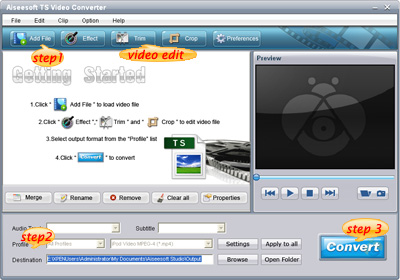
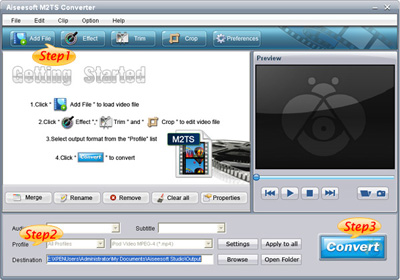
You have to convert these videos into the video formats the Xbox 360 Media Center Extender can playback. We recommend you to use Aiseesoft Total Video Converter (for Mac OS, choose video converter for Mac ) to convert all popular video formats to xbox 360 video and audio files perfectly with just a few clicks.

Play video on Xbox 360

Does the Xbox 360 support direct video streaming through Windows Sharing/Samba Shares?

No.

Can I watch DVDs through the Media Center Extender?
No, you can only watch DVDs by using the Xbox360's DVD drive.

Can I use a DVD Disc Changer through the Media Center Extender?
No. This functionality is not available in through the Xbox 360's Media Center Extender. You can only watch one DVD at a time by using the Xbox360's DVD drive.

Will My DVDs be available on the XBox 360?
"No. We did not implement the ability to remotely play back a DVD from a MCE to an XBox 360 Extender so it did not make sense to make My DVDs available. I certainly understand how cool it would be if you could put your MCE and full loaded DVD changer in a closest and use XBox 360's to watch your DVD collection from any room wirelessly but this is something that's going to have to wait until a future release." - Matt Goyer - MCE Program Manager

Can the Xbox 360 play video off the Xbox 360 Hard Drive?

Yes, but only video downloaded from the Xbox Live Marketplace or preloaded on the Xbox, not your own videos.
Can you hook up an external hard drive to the Xbox 360 and play videos off that?
No.

Recommended Products for you:
DVD to iPod Converter for Mac
It's a specially designed iPod conversion program to Convert DVD to iPod touch, iPod classic, iPod nano, convert DVD to iTunes on Leopard.
iPod Video Converter for Mac
It can convert MP4, MOV, 3GP, AVI, RM, MPEG, and FLV to iPod video with high output quality and various features.

2010年11月24日星期三

No, That’s Not Really Someone Giving Birth on Google Street View

It’s the day before Thanksgiving, and it could easily be a slow news day (unless you’re interested in armed conflict between North and South Korea). So: Yes, that photo of someone giving birth on a German street, supposedly captured by Google’s roving Street View camera, isn’t real. Just ask Google.

Facebook Acqhirees Make a Quick Mark on Its Products

Facebook has a well-defined M&A strategy of bringing in talent from young, small companies*. The company has reeled in 10 acquisitions this year, in most cases shutting down acquired services soon after a deal closes. The most it is known to have paid for a company is $50 million for FriendFeed. This has helped shape the epidemic of short-term thinking in today’s Web start-ups; sometimes, showing you are technically adept and have interesting ideas is all it takes for you to get a lucrative contract with Facebook and give your backers a mild return on their investment.

Bret Taylor

But there’s also a pattern emerging for what happens to that talent once folks arrive at Facebook. Acqhired CEOs hold prominent roles on Facebook’s product team; nearly every recent Facebook product launch seems to have been led by an acqhired employee. Most recently, Facebook Messages was product-managed by Dan Hsiao, who joined the company with the FriendFeed acquisition. Hsiao had actually been a more junior member of the FriendFeed team, having started there as an intern in 2008. Now he is managing what Facebook called the largest engineering team it has ever put together for a launch.

Meanwhile, former FriendFeed CEO Bret Taylor is CTO of Facebook. Hot Potato CEO Justin Shaffer was product manager for Facebook Groups and is now product manager for the company’s Places and Events products (his company was only acquired in August). Divvyshot CEO Sam Odio is now product manager for Facebook Photos. Nextstop CEO Carl Sjogreen now holds the title “head of platform development,” according to a Facebook spokeperson.

And Gokul Rajaram, known for his seminal work as a product manager on Google AdSense, is now in charge of Facebook’s ad technology. Rajaram came to Facebook through the acquisition of his company Chai Labs, also last August. Multiple sources confirmed Rajaram’s role at Facebook, though Facebook declined to.

Gokul Rajaram

Facebook has its reasons for keeping a big-name hire like Rajaram under the radar; for one, Google can’t be happy to have lost the opportunity to buy his start-up. The former Googler has been an adviser and director to multiple companies, including Canoe Ventures and Associated Content.

Elsewhere, Blake Ross and Joe Hewitt from Facebook’s first acquisition, Parakey, have had significant roles on products like Facebook Questions and the Facebook iPhone app. Ross’s title is Director of Product, though he is currently on sabbatical. Hewitt is working on undisclosed projects but “more on the engineering side,” said the spokesperson.

Facebook is not yet talking about where it will assign Sam Lessin, CEO of the just-acquired storage start-up Drop.io, and Cory Ondrejka and Bruce Rogers, founders of the just-acquired gaming start-up Walletin.

Facebook says it has about “two dozen PMs,” so the acqhired folks account for a significant but not dominant portion of that corps.

Facebook CEO Mark Zuckerberg told me last month:

We have a big footprint but we want to operate like a startup and take risks, and the best way to do that is to get people who self-select towards being entrepreneurs… The only real theme is that we haven’t bought any companies yet to get the company. It’s always been because we have a lot of respect for the people involved.

This kind of track record may make Facebook an even more enticing acquirer for small start-ups. On the other hand, it’s probably disheartening for Facebook’s homegrown talent to see these opportunities handed to people who are brand-new and who, in many cases, have little experience working at the scale of hundreds of millions of users.

*Facebook has also explored larger acquisitions of companies like Twitter and Foursquare (though Kara Swisher reported those talks were less serious than portrayed elsewhere), but those deals were never consummated.

2010年11月22日星期一

Memolane Makes Web Memories Last

Social media has a memory problem. Services like Facebook and Twitter exist primarily in the present. If I deleted my account on either site tomorrow, it would be a chafe to recreate all my connections, but I could start where I left off content-wise without feeling that I’d lost much. Though so many of our lives’ moments now exist online, rarely do we sit back and reminisce.

Facebook now allows users to “Download Your Information” into a Zip file, and Twitter has gotten somewhat better at storing older tweets so you can scan and search through them (they used to seemingly drop off a cliff). But there’s still an opportunity to help people enjoy the archive of their lives by making beautiful mashups and skins for these services.

The best-designed site I’ve seen to help create digital scrapbooks is named Memolane, and it calls them “web time machines.” If you want to try Memolane out, the Copenhagen-based company is doing its first public release of beta invites today.

Memolane’s interface is a horizontal timeline (partially pictured above). You plug in your social media accounts: Twitter, Facebook, Flickr, Foursquare, TripIt, Spotify, etc., and Memolane imports everything you’ve ever done on them and organizes it chronologically. Then use the arrow keys to scan through your life, or click on the expandable time line to see a specific day. You can keep your Memolane account completely private, make it public, or create a shared account where people can add items related to a specific group experience (say, all the pictures taken at a wedding).

Memolane is a lot like FriendFeed and other services that don’t make sense for people who don’t already express themselves in multiple places online. And there may not be a strong enough reason for some people to come back. This is basically a presentation layer for data that’s stored elsewhere, with no real interactions happening on Memolane itself (yet).

But I could see Memolane being useful in a number of different ways: in addition to personal scrapbooking, you might want to create a Memolane of your public-facing feeds and turn it into a personal splash page, something that’s more dynamic than alternatives like About.me. Or you might want to write a collaborative story of a major event in your life like the founding of a startup, as Memolane itself has done.

The company has already built some neat integrations; for instance, if you plug in your history from Last.fm or Spotify and then scan to a day where you were listening to music, you can replay those tunes inline. Overall, the HTML5 interface is responsive though not terrifically customizable.

Memolane has raised $2 million from Atomico Ventures and August Capital (CEO Eric Lagier is connected with both firms from his work running mobile for Skype from 2005 to 2008). Lagier said like to move the company to the San Francisco Bay Area if he can; for now its official headquarters are an SF mailing address on Market Street.

In terms of competition for Memolane, there are some direct ones like OurStory and AllofMe but they are not nearly as well designed. Dipity is a nice service that helps people build interactive timelines on any topic. There’s also the angle of making your archive of data more interesting by making it searchable, which is what Greplin is doing. But I don’t even want to look up the market research for how much money was spent on scrapbooking in the last year.

How to make iPhone Ringtones on Mac and Windows for FREE

I have many iPhone Ringtones on my iPhone, and I change them once one day. But I don’t buy them online. I just make iPhone Ringtones myself by Ringtone Maker Shareware. Actually, iPhone Ringtone maker is m4r Ringtone Maker, such as mp3 Ringtone Converter, WMA Ringtone Converter and WAV Ringtone Converter. There are also iPhone Ringtone Converter for Mac or iPhone Ringtone Creator Mac.

Here I will share how to make iPhone ringtones on Windows and Mac.
For Windows:
Firstly, you need download iPhone Ringtone Maker.

iPhone Ringtone Maker

Step 1: Load Music
Click “Browse” on the right side of “Input File” to find your music that you want to make as your iPhone ringtone and click “Open” to load it into iPhone Ringtone shareware.
Step 2: Choose iPhone Ringtones
1. Drag your “Start Slider” to the beginning of the “Slider Bar” and “End Slider” to the end, then Listen iPhone Ringtone 
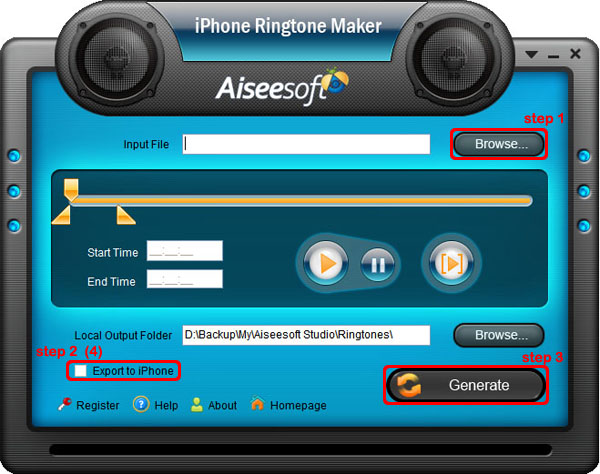
to listen your whole audio file.>br/>2. a. Drag the “Start Slider” to find where is the beginning of your ringtone and Drag “End Slider” to make an End of it.
b. Type the exact “Start Time” and “End Time” in the box to choose your ringtone.
3. ClickPre-listen iPhone Ringtoneto pre-listen your ringtone.
4. If you want to put your ringtone directly on your iPhone, just plug your iPhone to your computer and check “Export to iPhone” (4). If you just want to put it on your computer, click “Browse” on the right of “Local Output Folder” to find a place to put it.
Step 3: Generate iPhone Ringtones After you have done the 3 steps, just click “Generate” to make your iPhone ringtones.

For Mac:
If you are a Mac user, you need to find iPhone Ringtone Converter for Mac or iPhone Ringtone Maker for Mac.
Here I have one for you, just download this iPhone Ringtone Maker for Mac.

iPhone Ringtone Maker for Mac
The process of making your own iPhone ringtone on Mac is the same as on Windows.
Hope you enjoy this DIY process.

2010年11月21日星期日

How to upload videos to YouTube from iMovie

Making movies on your Mac is fun and easy, but how do you share them with the world? Many people choose to upload videos to YouTube from iMovie.
Part 1, How to upload videos to YouTube from iMovie HD
Part 2, How to upload videos to YouTube from iMovie

Part 1, How to upload videos to YouTube from iMovie HD
1. Make sure your video is the one you want to upload, then click the share button in the menu bar.
2. Select the QuickTime option.

upload video to youtube

3. Click on the menu for your compression options and select web.

upload video to youtube

4. Save your movie to the desktop or somewhere else. Find your movie and click it once then press apple+I to get its information. Make sure it is less than 100 megabytes or YouTube will not accept it.
5. Log in to YouTube and click on the “upload” button at the top of the page.
6. Enter the name, category, tags and any other information you want for your video.
7. Next click on “upload a video” once you have finished entering your videos information.
8. Click on the “Choose File” button and choose your video file from were you saved it. Make sure its your compressed QuickTime video and not the iMovie file.
9. Lastly click on the “Upload Video” button, it may take a few minutes for your video to upload and it may take several hours for it to show up on YouTube.
I also recommend CD quality. You can save the movie to CD-ROM and then you can upload movie from iMovie HD to YouTube!

Part 2, How to upload videos to YouTube from iMovie
1. Make sure your video is the one you want to share, then click the share button in the menu bar and select YouTube.
2. Choose your YouTube account or create a new one
3. Confirm your sign in.
4. Select the category, name, description, and tags for your video.
5. Select your publish size and click Next
6. Now click the publish button.
7. Your video will be ready to watch on YouTube in 2-120 minutes.

Google has released basic software called Vidnik which is the quickest, simplest way to make movies using the built - in camera on your Macintosh and upload those movies to your YouTube account. You must first sign up for a free YouTube membership to upload videos.
Learn more: How to upload videos to YouTube easily and quickly on Mac?

2010年11月19日星期五

How to share the iTunes Music and videos between two computers for free

Some people may meet that situation: You and your brother both have iTunes library under the same credit card account. Occasionally, you want to get the same song, however you wouldn't want you both to pay the $0.99 where virtually the same account is purchasing the song twice. So how can you and/or he download the songs from each other once it's purchased on a single computer? This is a guide to tell you how to share iTunes Music and videos between two computers such as sharing iTunes Music and videos between Windows PC and Mac OS X, sharing iTunes Music and videos between Mac OS and Mac OS X and sharing iTunes Music and videos between Windows PC and Windows PC

Step 1, Networking computers.
If you want to share iTunes videos and music between computers, you need to network PC and Mac first.
If you do not know how to Network Windows with Mac OS X, go there:
Networking Windows (2000/XP/2003*) with Mac OS X (10.3/10.4)
Information you will need to know
1.The IP Address of your PC (Start > Run > CMD {return} > "ipconfig" {return})
2The IP Address of your Mac (Applications > Utilities > Terminal {Run app} > for ethernet connection "ipconfig getifaddr en0" {return} or for wireless "ipconfig getifaddr en1" {return})>
3.The workgroup the PC is in (Right click on My Computer, select Properties, and select the Computer Name tab)

System Configuration
It is important that the account you log in with on your XP system has a password set, if it does not you will not be able to login to your Windows share from OS X. You need to put your Mac in the same workgroup as your Windows PC. To do this open "Directory Access" (Applications > Utilities > Directory Access). Click on the padlock in the bottom left corner to make changes; you will be prompted for your password. If "SMB" is not ticked off, then tick it off. Select "SMB" and hit the "Configure…" button. Now enter the name of your Windows workgroup. In my case the name is "AD".

Share iTunes videos between pc and Mac, iTunes videos from pc to Mac

Setting up the PC to share files
You need to create and share a folder on your PC that you will then access from your Mac. To do this create a folder (or select and existing one) right click on it from Windows Explorer and select "Properties". Select the "Sharing" tab and share out the folder. I'd recommend you use a one word name for the share. For example "Mac", not "Apple Mac Share", it just narrows the risk of complications.

Share iTunes videos between pc and Mac, iPod videos from pc to Mac

Setting up the Mac to share files
Open "System Preferences" (Applications > System Preferences). Go to "Sharing" under "Internet & Network", and tick off "Windows Sharing", and if it doesn't start by itself, click "Start". This will share out your entire home folder.

iTunes videos from pc to Mac

If You're running Tiger (10.4), you will also need to click the "Accounts" button and tick off the box next to your account name so that OS X knows to share out your particular home folder.

iTunes videos from pc to Mac

Step2, Go to preferences, under the sharing tab, enable "Share library..." and "Look for shared libraries..." on both computers.
Select the items you want to share.share iTunes videos and music for free

It will show up in iTunes' side panel:
share iTunes videos and music for free

To require users to enter a password before they can see your shared items, select "Require password" and enter a password.
You will need to authorize both computers to play purchased content however. You may authorize up to 5 Machines per iTunes Music Store account.
Tips:If you want to share music with other users on your computer ,read this article: iTunes: How to share music between different accounts on a single computer

2010年11月16日星期二

Palm Chief: By Birthright, Palm Should Have Owned the Smartphone Market

What Palm chief Jon Rubinstein’s appearance at Web 2.0 Summit today lacked in news, it made up for somewhat in perspective–on the mobile space, Palm’s smartphone birthright, its acquisition by Hewlett-Packard and its future under HP.

“Palm created the PDA (personal digital assistant) space with the Pilot and the smartphone space after it with the Treo,” Rubinstein said this morning, reflecting on the company’s state when he first came to it. “So by birthright, Palm should have owned the smartphone market, but it just lost its way. It’s a very similar story to what happened with Apple.”

Except, of course, Apple never forfeited its independence to another company in the hopes of reclaiming its birthright, or to execute the broader vision of connected devices that arose from it. But in Palm’s case, its acquisition by HP made perfect sense. “We needed more resources,” Rubinstein said. “We could not compete in a fashion that would allow us to be one of the premier companies in the marketplace. And HP needed a strong mobile strategy around which they could innovate–one that would allow them to control their own furture and not rely on the kindness of strangers.”

In other words, to differentiate and succeed in the mobile device space, you need to own a veritically integrated stack strategy–software, hardware and services–like the one Palm is now building out with the help of HP’s not inconsiderable resources. “We’ve actually pulled a couple hundred people out of HP and made them part of Palm,” Rubinstein explained. “We’re using them to broaden our scope and we’re just cranking away. Our view is we’re going to see people with more and more devices in the future and HP is in the middle of all this. So our focus is to deliver a unified experience for that around webOS.”

So what’s Palm got in the pipeline for next year?

“We’ve got some great products in the works,” Rubinstein said. “Some smartphones, a great tablet coming. I think we have several products that will be hits when they come out….Everyone forgets, we just closed this acquisition in July….This time next year, you’ll see us in a very different position.”

2010年11月15日星期一

Aro Offers a Parallel Universe Where Mobile Apps Work Together

Aro Mobile on Tuesday will be presenting at the Web 2.0 Summit in San Francisco. The company makes a set of search-driven mobile apps for Android that link together so they can be more useful. (It is still in private beta, but as of tomorrow those who sign up on the waiting list will get in more quickly.)

After analyzing your address book, emails (only Gmail and Google Apps for now), calendar and other information you give it, Aro compiles a linked library of topics and people that are relevant to you. Then it uses that information to help you complete actions that usually are tedious on a smartphone because they require users to open all sorts of different apps.

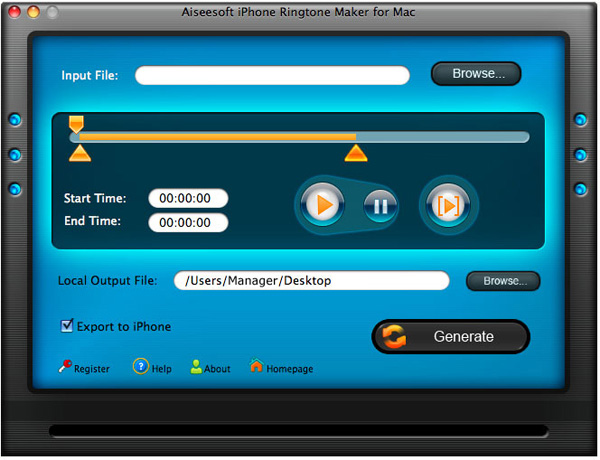
Say you’re using the Aro mail client: any name that’s mentioned in an email will be highlighted in a bubble that you can click on to see all the people by that name in your address book and call one directly. You can also search through all your correspondence with that person over time, through various email addresses and phone numbers.

Or if someone schedules an appointment with you and you view it in Aro, you can add it to your calendar from within email and look up more information about and directions to the location right there.

Aro syncs all this information back to the original hosts of your email and calendar, though you don’t ever have to open the old apps on your phone.

I’ve been trying Aro for the last couple of days and I can start to see the potential. However, it’s pretty awkward to have the Aro parallel experience layered on top of everything I’m used to doing. My existing phone, email, SMS, address book, calendar and mobile browser apps are now all redundant with Aro versions. The simple action of making a phone call on my setup now requires clicking through an Aro dialog, then a Google Voice dialog — it’s a little too much.

These tools would be much more awesome if they were more tightly integrated into the operating system itself rather than as a whole bunch of apps. Aro CEO Jon Lazarus says he’s working to strike deals with carriers and handset partners to release phones with tighter Aro integration, which would help a lot.

Playing around with Aro makes me think about the potential for a smarter mobile phone that combined Aro integrated apps with something like Siri’s voice-activated commands. Siri, which launched at D7 and was bought by Apple, is a virtual personal assistant iPhone app that helps users tie into a whole bunch of web services to do things like make reservations at nearby restaurants. You can start to imagine how a phone would understand a lot more about its owner, and actually help get things done.

Failure to Launch: Why Barry Diller’s IAC Can’t Innovate

Media mogul Barry Diller, the chief executive officer of Web titan InterActiveCorp (IAC), now finds himself in a peculiar and unfamiliar positon: playing defense.

Yet another component of IAC — 3D Web-gaming site InstantAction — folded today after receiving a majority investment from IAC in 2007.

Read the rest of this post on the original site

2010年11月14日星期日

How to put movies on an iPod

How to put movies on an iPod is always a problem that most iPod users are confused about. There are many tools can help you to convert video on iPod, such as avi iPod Converter for Mac, Mpeg 4 iPod Converter, 3gp converter for iPod and so on. Those tools can help you to put avi, wmv, 3gp, Mpeg on iPod easily. This is the easiest way to put movies on an iPod. You can also put movies from one iPod to another one and from computer to your iPod directly with iPod transfer tools.

This guide includes two Parts:
Part 1: How to put movies on an iPod for Windows (convert & transfer)
Part 2: How to put movies on an iPod for Mac (convert & transfer)

Part 1: How to put movies on an iPod for Windows
A. With Converter
Step 1: Download and install Aiseesoft iPod Video Converter.

put movies on an iPod for Windows With Converter

Step 2: Add Video
Click “Add File” button to load your movies that you want to put on iPod.
Step 3: Choose output format
You can choose your output format according to your iPod’s generation from the drop-down list named “profile”. You can also adjust the settings of your output video by clicking “Settings” button.
Step 4: Start Conversion
Click “Start” button to begin your conversion.

B. With Transfer
Step 1: Free download Aiseesoft iPod Transfer.

put movies on an iPod for Windows With Transfer

Step 2: Plug iPod
Plug your iPods or iPhones to computer
Step 3: Find movies
Find the movies that you want to put on your iPod from the other iPod.
Step 4: Transfer
Click “Transfer” button

Part 2: How to put movies on an iPod for Mac
A. With Converter
Step 1: Download and install Aiseesoft iPod Video Converter for Mac.

put movies on an iPod for Mac with Converter

Step 2: Add File
Click “Add File” button to load your movies that you want to put on iPod.
Step 3: Profile and Settings
Choose your output video’s profile from a drop-down list and you can also adjust the settings of your output movie.
Step 4: Conversion
Click “Start” button to begin your conversion.

B. With Transfer
Step 1: Download and install Aiseesoft iPod Manager for Mac.

put movies on an iPod for Mac with Transfer

Step 2: Plug
Plug your iPod via USB cable.
Step 3: Find Movies
Find your movies you want to put your iPod from your local disk.
Step 4: Transfer
Click Transfer button to begin your transfer and seconds later you will get your movies on your iPod.

2010年11月11日星期四

How to put DVD movie into Windows Movie Maker and iMovie

If you want to edit a DVD movie with Windows Movie Maker or import several DVD clips into Mac iMovie to build a new DVD, but you get frustrated with the DVD format, this guide may help you solve the problem.

Before you get started, it will be helpful if you learn something about the DVD, WMM and iMovie.
General DVDs have CSS copy protection in MPEG-2 or VOB format.
(Windows) Windows Movie Maker supports WMV, AVI and MPG video files.
(Mac) iMovie accepts MOV and MPEG4 video files.

This guide includes two parts:
1. How to put DVD movie into Windows Movie Maker.
2. How to add DVD clips to Apple Mac iMovie .

Part1. How to put DVD movie into Windows Movie Maker

Step1. To put a DVD movie into Windows Movie Maker, you have to rip your DVD to WMV or AVI video first, and then you can load it into Windows Movie Maker. I’d prefer using Aiseesoft DVD Ripper to do this. You can get this program at: http://www.aiseesoft.com/dvd-ripper.html Then install and run it, put your DVD disc into your DVD drive, click “Load DVD” to locate your DVD file and import it, or load it by clicking “Load IFO File” to add DVD IFO file. (This DVD Ripper can rip copyright protected DVD movies, but you should remember that it’s illegal rip DVD for any business purposes)

Rip DVD with DVD Ripper for WMV

Step2. Select output format and subtitle

After you load the DVD files, click the format drop-down list to select “WMV – Windows Media Video (*.wmv)” or “AVI – Audio Video Interleaved (*.avi)” as the output format. A regular DVD movie has multiple subtitles and audio tracks, and you can select the right one for you. If you just want a certain part of the DVD movie, you can click “trim” to cut the DVD movie. Just drag the timeline bar to set the start and end time, and then blue line will be the captured parts.

Rip DVD into Windows Movie Maker

For advanced user, if you want to output higher quality video, click the “Settings” button to open the panel, here you can customize video bitrate, audio bitrate, resolution, framerate, etc. Higher bitrate will result in bigger file size.

Step 3. Start to convert

After the above steps, you just need to click “Start” and wait for the conversion to be finished. It provides the fastest conversion speed (>300%), completely support dual core CPU.

Step 4. Edit DVD with Windows Movie Maker (optional)

Run Windows Movie Maker, in the “Movie Task” bar, click “Add Video” to browse your computer and located the converted files, and then you can start to make personal movies.

Edit DVD with Windows Movie Maker

Tips:Many users may wonder how they can convert Windows Movie Maker file (*.MSWMM) to other video format. Actually, A *.MSWMM file is not a video file. It is a project file of Movie Maker (more like a record file). You have to open this file in Windows Movie Maker and save the movie to your computer: Go to Movie Tasks bar > Finish Movie > Save to my computer. After that you will have a WMV file which can be converted to another video format or burned to DVD.

Part2. How to add DVD clips into Apple iMovie.

iMovie is similar to Windows Movie Maker, it supports MOV and MP4 video, so you just need to convert your DVD movie to the right format. Aiseesoft DVD Ripper has a Mac Version which supports both Mac OS Tiger and Leopard; you can download it for free from here: http://www.aiseesoft.com/dvd-ripper-for-mac.html
It is easy to use for the operation steps being similar to the windows version.

put DVD into Apple iMovie

When the conversion is finished, you can run the iMovie, build a new project, and then drag the converted files to the work space to make personal files.
When the task is finished, In the Menu bar, Click "File" -> "Export" and save it as QuickTime video.

put DVD into Apple iMovie

Download Aiseesoft DVD Ripper for Windows (put DVD into Windows Movie Maker)
Download Aiseesoft DVD Ripper for Mac (put DVD into Apple iMovie)

2010年11月10日星期三

How to change iPhone Wallpaper

Here are the easy steps you can take to change iPhone Wallpaper easily.

Make preparations:
Step 1: Find an image that you would like to use as wallpaper from iPhone Wallpaper.
Step 2: Right-click on a PC or control-click on an Apple computer and select "Save As" to save the image to your computer. Save it to your "My Pictures" folder or iPhoto library on a PC or Apple respectively, or wherever you prefer to store your images on your computer as long as you will be able to easily locate it.
Step 3: Connect the iPhone to your computer with the USB cable and wait for iTunes to launch itself automatically. Click on the "Photos" tab in the side panel.
Step 4: Click on the "Sync Photos From:" tab in the "Photos" menu on iTunes and locate the folder where your photos are stored. Select all of the images that you would like to transfer your to iPhone. Click on "Sync" in iTunes to transfer all of the photos to your iPhone.

Change iPhone Wallpaper
Step 1: Tap Settings on the iPhone’s home screen:

Change iPhone Wallpaper

Step 2: Tap the Wallpaper tab:

Wallpaper Tab in iPhone Settings

Several tabs should appear, including one that says Wallpaper. You can tap any of the tabs to select wallpaper for the iPhone. The Wallpaper tab features a collection of pictures supplied by Apple. The other tabs feature pictures you have added to the iPhone, including those taken with the iPhone’s camera.

Wallpaper Selections

Step 3: Tap any picture. A preview screen of the wallpaper will appear, along with the words Move and Scale at the top. You can pinch and reverse pinch the picture to resize. The transparent bars at the top and bottom simulate the bars for the clock and Slide to unlock that will eventually display on top of your wallpaper.
In the example below you can see that the heads of the two peoples will be partially covered by the top bar:

Resize iPhone Wallpaper

To fix, I will reverse pinch to expand the picture, then drag the picture so that their faces appear in the center:

Resize iPhone Wallpaper
Step 4:
Tap Set Wallpaper to finish.
To view your new iPhone wallpaper, put the iPhone to sleep by pressing the sleep button on the top of the iPhone. Then hit the home button to wake the iPhone, and you should see the wallpaper.
Note the position of the clock and Slide to unlock transparent bars. If you’re unhappy with the position of the wallpaper, repeat the steps above.

2010年11月8日星期一

You May Be Reading This in the Bathroom, on Your Phone

Give Microsoft credit for this one: It’s ginned up a press release I have no choice but to pass along to you.

It’s designed to get me to mention today’s Windows Phone 7 launch (Katy Perry! Maroon 5!), and I’m totally fine with that. Because in return, Microsoft has provided us with a series of great statistics about “Bad Mobile Phone Behavior,” gleaned from a poll conducted by Harris Interactive.

If you like bathroom humor, you’ll enjoy these stats (via TechFlash):

  • 48 percent of adults think that it’s bad to talk on the phone in a public restroom.
  • 43 percent of adults think it’s not okay to text, email or Web surf in a public potty.
  • Which means, presumably, that the majority of adults think it’s just fine to talk, text and type away while you’re in the stalls.
  • Unless that means you drop your phone in the toilet, which 19 percent of adults 18-24 say they’ve done. (Me too, though I was well out of the demo by that point.)

Going Flash-Free on Mac OS X, and How to Cheat When You Need It

Last week I mentioned that, following Steven Frank’s lead, I’d completely disabled Flash Player on my Mac. But I have a cheat, for web pages with Flash content with no non-Flash workaround.

Read the rest of this post on the original site

2010年11月7日星期日

My Summer on the Content Farm

Remember that “I Love Lucy” episode where Lucy and Ethel take jobs in the chocolate factory and the conveyor belt starts pumping out candy faster than they can pack it in the wrappers so they start stuffing their faces and cleavage with the excess, cowering from the intimidating factory matron? That’s kind of what it’s like to work for Demand Media, as I found out during a brief, ill-fated stint as a freelance copy editor at the 17th largest web property in the U.S. this summer.

Read the rest of this post on the original site

2010年11月4日星期四

How to convert MTS, TS, M2TS Video to HD video, MP4, WMV, AVI

Record everything around you and share with the world/friends/family is becoming more and more popular among young people. Get a HD Camcorder is necessary and also how to share is really important. I think you can use youtube.com, make a DVD and so on. As the video you record on your camcorder is MTS, TS, M2TS or other HD video format, so you have to convert them into normal video format to edit.

Today I will share with you how to convert MTS, TS, M2TS video to normal video formats.
You need 3 nice tool to do it: MTS Converter, TS Video Converter, M2TS Converter.

Part 1: How to convert MTS video
Step 1: Load Video
Click "Add File" to load the video that you want.

MTS converter

Step 2: Choose Your Output Profile and Settings
From "Profile" drop-down list you can choose your output profile according to your need.
For example, if you have a iPod and you want to convert video for it, you need to choose "iPod" from the profile list and then it also provides the second chance to specify your iPod generation.
You can also click "setting" adjust the settings of your output video, such as "video/audio encoder", "Video/audio Bitrate", "Channels", "Resolution" and so on..

Step 3: Video Editing
This powerful MTS Converter allows you to do many video editings.
1. Click "Effect" to make special effect for your movie.
You can adjust the "Brightness", "Contrast", "Saturation" and also you can use "deinterlacing" to improve you output effect.

effect

2. Trim:
"Trim" function allows you to pick up any part of your video to convert. You can just convert a part of your video that you want.

trim

3: Crop:
Cut off the black edges of the original movie video and watch in full screen on your iPod using the "Crop" function.

crop

Step 4: Conversion
After you have done all the steps above you can click "Start" button to start your conversion.

Part 2: How to convert TS video

TS video converter

Step 1: Load Video
Click "Add File" to load the video that you want to convert.

Step 2: Choose Your Output Profile and Settings
From "Profile" drop-down list you can choose your output profile according to your need.
You can also click "setteing" adjust the settings of your output video, such as "video/audio encoder", "Video/audio Bitrate", "Channels", "Resolution" and so on..

Step 3: Conversion
After you have done all the steps above you can click "Start" button to start your conversion.

Tips: Video Editing
This powerful TS Converter allows you to do many video editings.
1. Click "Effect" to make special effect for your movie.
You can adjust the "Brightness", "Contrast", "Saturation" and also you can use "deinterlacing" to improve you output effect.
2. Trim:
"Trim" function allows you to pick up any part of your video to convert. You can just convert a part of your video that you want.
3: Crop:
Cut off the black edges of the original movie video and watch in full screen on your iPod using the "Crop" function.

Part 3: How to convert M2TS video

M2TS converter

Step 1: Add File
Load your M2TS video.

Step 2: Choose Profile and Settings
Select your output profile according your need and adjust the settings of your output video if you like.
(the default setting works well)

Step 3: Start Conversion
Click "Start" to begin your conversion.

2010年11月2日星期二

Some problems the new iPod touch users may meet

1. How to change iTunes to recognize the new iPod touch
Some New iPod users may meet the situation that your iTunes can not detect your new iPod nano, iPod touch, or iPod Classic. It should recognize it immediately. If it doesn't, download the latest version of iTunes. The problem will be solved:
1) Re-launch iTunes, with and without your iPod plugged in.
2) With iTunes open, reset your iPod Touch
(here:http://docs.info.apple.com/article.html?artnum=305743 ) Press and hold the Sleep/Wake button and the Home button at the same time for at least ten seconds until the Apple logo appears.
3) Restart your computer leaving your iPod touch plugged in
Note: If you uninstall iTunes from a computer, it will be uninstalled for all the users. But it will show up again for all users once you re-install it again. Before uninstalling each user should backup his/her playlists so they can bring them back when the re-install is completed.No music for any of the users will be removed by iTunes. It will remain intact where it is saved.

2.'I can't turn on my iPod'
I have a 1st or 2nd generation video iPod (80 gig).
My computer is windows 2000 so I downloaded the windows 2000 iTunes. So I decided to update my iPod, it was updated and it was fine. It ran out of power. Then it won't turn on? I tried to charge it but it just keeps saying please wait such and such. I left it there for like 2 hours already, and still it didn't charge up... Is the problem because I updated my iPod or something else? And when I opened my computer, iTunes asked me if I can format my iPod into windows. I put yes, it didnt do anything.So I have to problems, its not charging.. and its not turning on.
by Ashley :'My friend had this same problem a few years ago.She just left it plugged in to her computer for a few days, waited it out... eventually the problem fixed itself on its own. I'd say just wait it out for a day or two, and if it's still having problems, take it in to your nearest Circuit City or something.”
by Karat :'its the most popular iPod problem. If you drain the battery fully, you're screwed. Basically the battery is down, but the darn thing wont charge unless you connect it to the usb and the usb wont detect it unless it has charge! So please take it to your nearest apple outlet.”
by Kylla :'The one thing you never want to do with an iPod is let it run out of power, not good for it at all :P I've done it a few times but try to avoid it. What you want to do is hold the menu button and the play/pause button at the SAME time and just wait for it. It should restart it. Thats how my iPod works, yours could be different so experiment with the buttons. Try holding perhaps the center button and the play/pause button? or center button and the menu button? Try to see which two buttons will restart it, its bound to work. But hold BOTH of them down at the SAME time with one hand..and be patient, wait for about 10-15 seconds or so. :)”

3. Why does my 30G iPod video always die quickly?
Even when I am just listening to music. It shuts off after about 45 min. And that is a problem because I am going on a plane trip soon and I plan to watch a movie on my iPod, but movies eat your batttery. Does this happen to anyone else???? How can I make the battery life last longer. btw, it is only like a year old.
by dipin :'In an iPod the battery life is different.
it doesnt depend on how old it is rather it depends on how many times you have charged and discharged it.
for increasing the battery life you should fully charge the battery every time you are charging it . and secondly you should never let it discharge completely . put it on charging just before it shows the red signal and disconnect it only when it is fully charged.
sorry to say but now u'll have to get the battery replaced from apple reseller if you want to watch complete movie the battery life as said by apple is 500 complete cycles of charging and discharging”
by sugadoll :'The same thing happened to me. The problem is that your computer can't detect a completly dead iPod, but you need the computer to charge it so your screwed. j/k I solved it by pluging it into my ihome dock that plugs into the wall. So if you have a wall iPod dock or a car one you can charge it enough so that the computer can detect it. Problem solved.

Recommended Products For you:
DVD Ripper for Mac
Convert DVD to any video or audio formats on Mac OS X. Aiseesoft DVD Ripper for Mac is a professional Mac DVD ripper software.
Video Converter for Mac
Convert all video formats from one to another on Mac OS X. Aiseesoft Video Converter for Mac is a specially designed Mac video converter.

2010年11月1日星期一

Twitter Investor Defends New “Tweet” Usage Rules

Twitter is taking heat in the tech blogosphere (here and here) over its new guidelines about how others can use the words “Twitter” and “Tweet.” Now some well-known technology investors are also saying “Hey, Twitter, enough of this.”

Read the rest of this post on the original site